DBR-1
Sampling Rhythm Machine — User Manual
1. The screen
Tablet
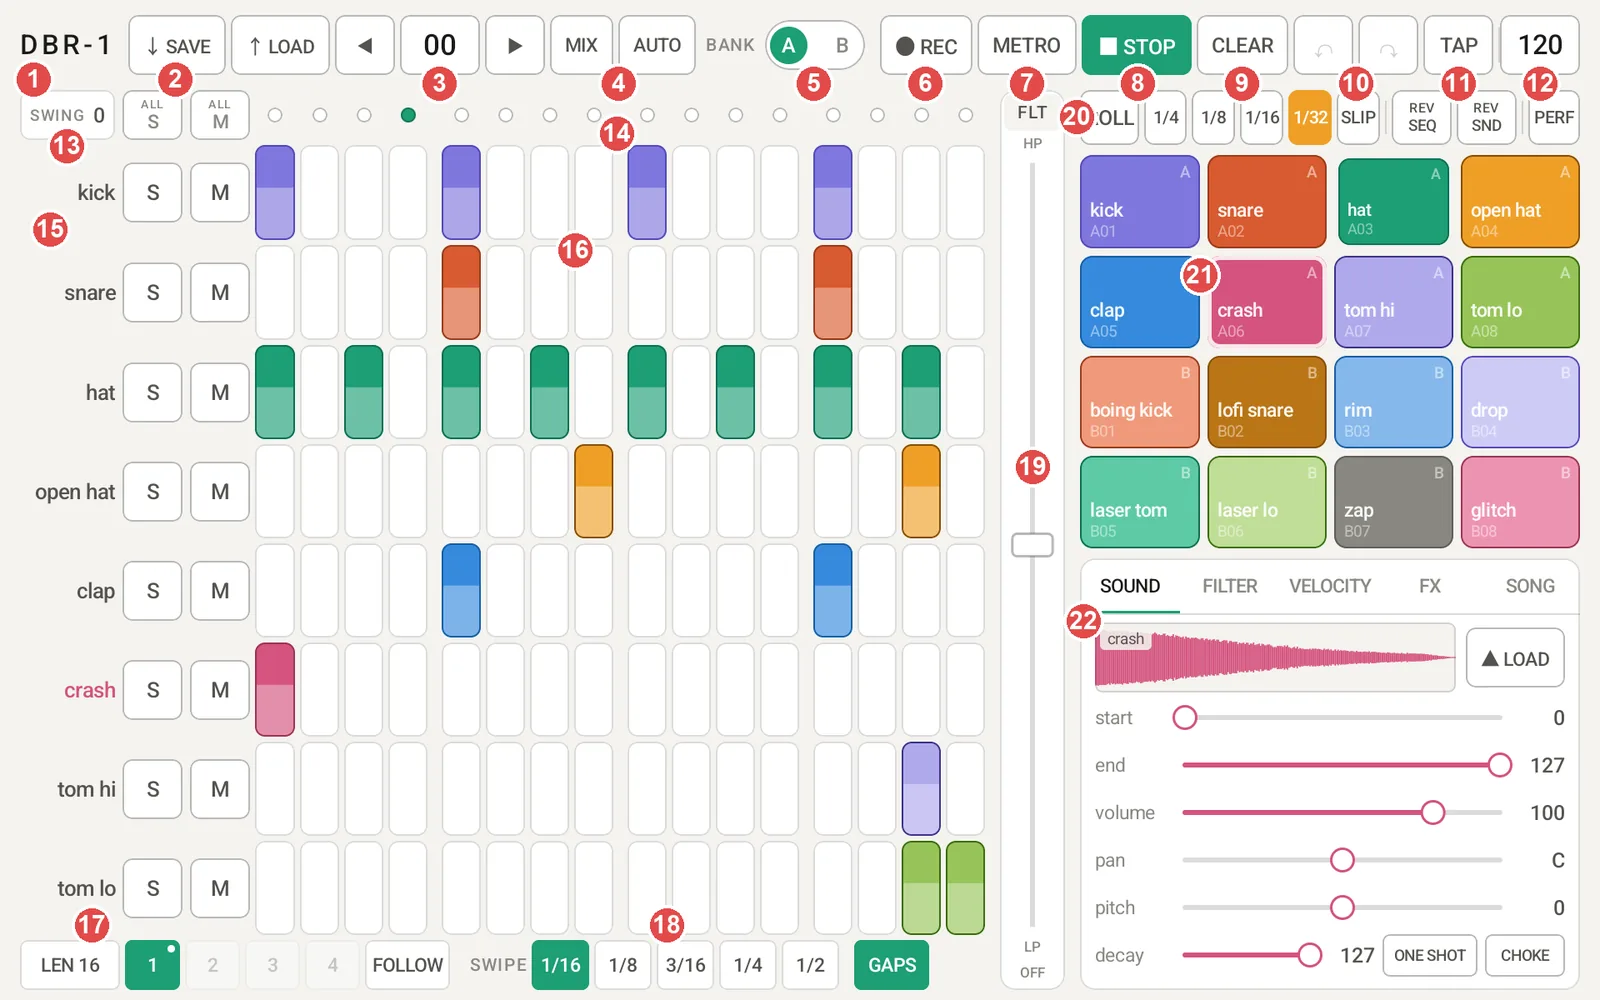
| # | Name | What it does |
|---|---|---|
| 1 | Logo | Tap for the menu: this Manual, MIDI settings (MIDI…), audio inputs and outputs (Audio I/O…), moving knobs with automation (Animate automation), whether PLAY after STOP starts over or continues (After STOP), when a pattern change happens while playing (Pattern switch), the phone-style layout (Phone layout), About |
| 2 | SAVE / LOAD | Save and load projects, patterns and kits (→ 10). LOAD → Templates… for classic genre beats (→ 2), Demo songs… for the demo songs (→ 2) |
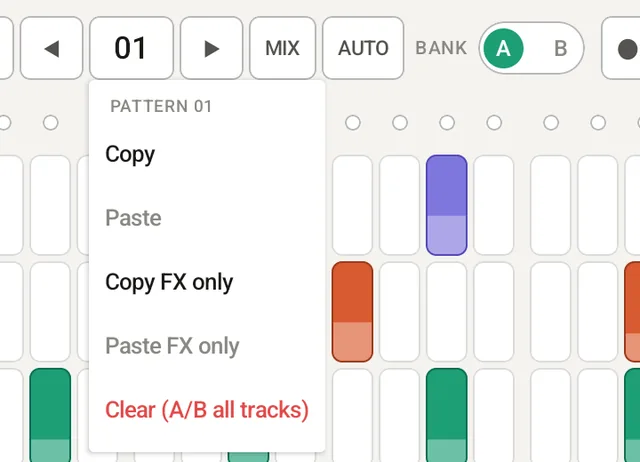
| 3 | Pattern number | ◀ ▶ to change (00–99). Tap the number to type it; long-press for Copy / Paste / Clear (also FX only) |
| 4 | MIX / AUTO | MIX switches between the step view and the mixer (→ Mixer); AUTO opens the automation view (→ Automation) |
| 5 | BANK A / B | Shows tracks A01–A08 or B01–B08 |
| 6 | REC | Arms recording. Pads you hit while playing are recorded (→ 4) |
| 7 | METRO | Metronome on / off |
| 8 | PLAY / STOP | Start and stop. By default PLAY after STOP starts from the top. Set After STOP in the menu to continue to carry on from where you stopped (while the pattern / song row is unchanged; choosing a pattern while stopped, or playing a song to its end, starts over. When sending MIDI clock, DBR-1 sends the position (Song Position Pointer) and Continue) |
| 9 | CLEAR | Clears the steps of the bank on screen (↶ brings them back) |
| 10 | ↶ ↷ | Undo / redo (up to 100 steps) |
| 11 | TAP | Tap along with the beat to set the tempo |
| 12 | BPM | Tempo. Tap for a slider, long-press to type a number (→ 9) |
| 13 | SWING / ALL S / ALL M | Swing (drag sideways), and solo / mute for the whole bank |
| 14 | Position | The step that is playing. Lights red during the recording count-in. The step buttons that play also flash, like the pads |
| 15 | Track name, S, M | Tap to select, long-press for the track menu (→ 3). S = solo, M = mute |
| 16 | Steps | Tap to turn on / off. The bar inside shows the velocity |
| 17 | LEN, pages, FOLLOW | Pattern length (1–64 steps), the page on screen (1–4), and whether the page follows the playhead |
| 18 | SWIPE, GAPS | Spacing used when you swipe across steps (→ 2) |
| 19 | FLT (master filter) / USER | Up = high-pass, down = low-pass. Tap the name above it to switch to USER1, USER2 … (adds to / subtracts from assigned parameters); long-press to assign (→ 7) |
| 20 | ROLL, SLIP, REV, PERF | Performance buttons (→ 7). PERF opens the performance screen (→ 7) |
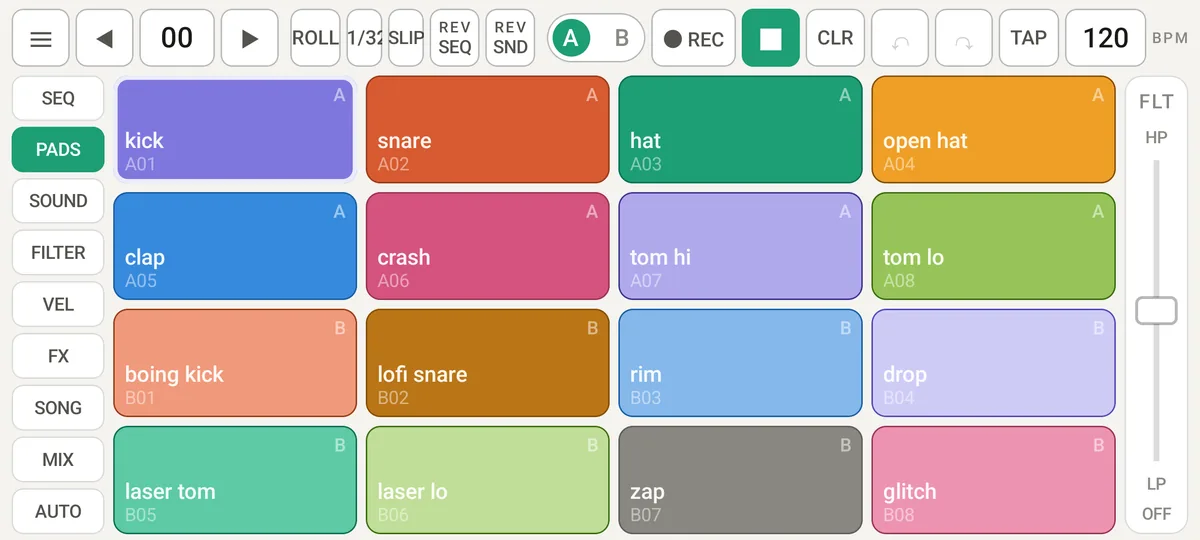
| 21 | Pads | Hit to play the sound and select that track. While playing, the pad of each track that plays lights up |
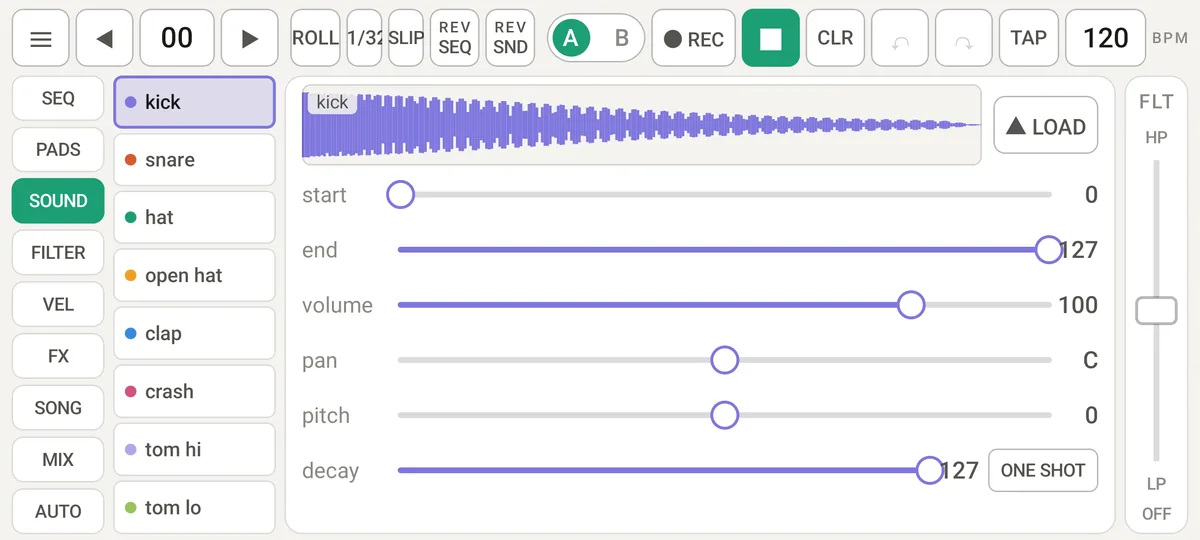
| 22 | Tabs | SOUND / FILTER / VELOCITY / FX / SONG |
Phone
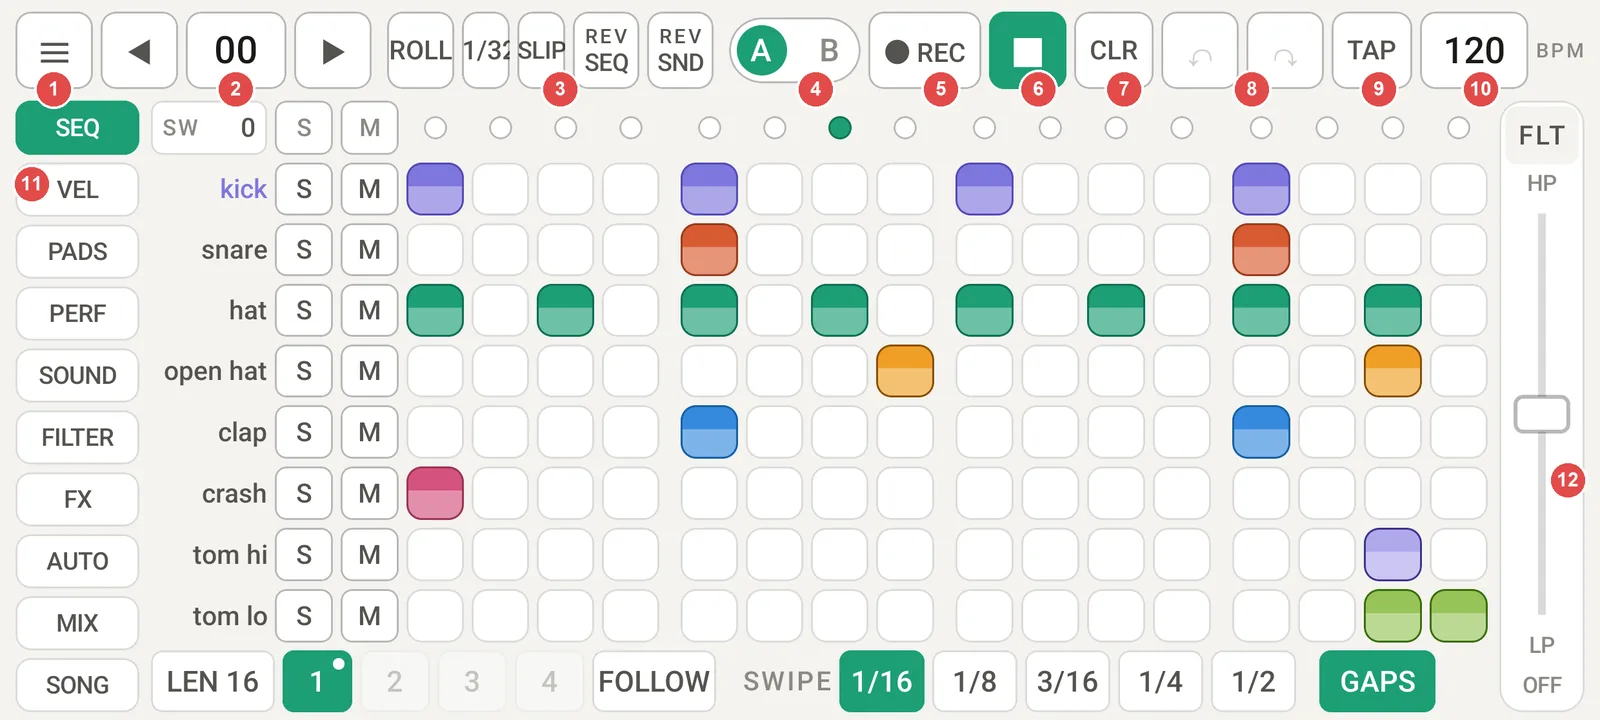
| # | Name | What it does |
|---|---|---|
| 1 | ≡ menu | Save / load, Metronome, Manual, MIDI, Audio I/O, Animate automation, After STOP, Pattern switch, About. On a tablet set to Phone layout, Tablet layout at the top switches back |
| 2 | Pattern number | Same as on the tablet |
| 3 | ROLL, length, SLIP, REV | Tap the length to cycle 1/4 → 1/8 → 1/16 → 1/32 |
| 4–10 | BANK, REC, ▶, CLR, ↶↷, TAP, BPM | Same as on the tablet |
| 11 | Views | SEQ (steps) / VEL / PADS / PERF (performance screen, → 7) / SOUND / FILTER / FX / AUTO (automation) / MIX (mixer) / SONG. Long-press a tab (it vibrates) and drag up or down to reorder them to suit your genre or workflow (saved on the device; "Reset tab order" in ≡ restores the default) |
| 12 | FLT | Master filter / USER (available on every view except PERF) |
2. Making a beat
- Press PLAY.
- Tap steps to turn them on or off (they change when you lift your finger).
- To use another sound, tap its track name or pad to select it.
Start from a genre template
LOAD → “Templates…” puts a classic beat from one of 10 genres (Hip-Hop, Trap, Lo-Fi, House, Techno, Drum & Bass, Funk, Rock, Reggaeton, Afrobeats) into the current pattern number. The BPM and SWING change to suit the genre.
- BASIC = the main groove, VARI (VARIATION) = a variation, FILL = a fill for the end of a section.
- ALL 3 puts all three into the current number and the next two. Chain them in SONG (e.g. BASIC ×3 → FILL ×1) for an instant arrangement.
- Templates use the 8 tracks of BANK A (kick to tom lo). You are asked before anything is overwritten. Undo (↶) brings them back (with TEMPO set to GLOBAL, the BPM is not undone).
Listen to the demo songs
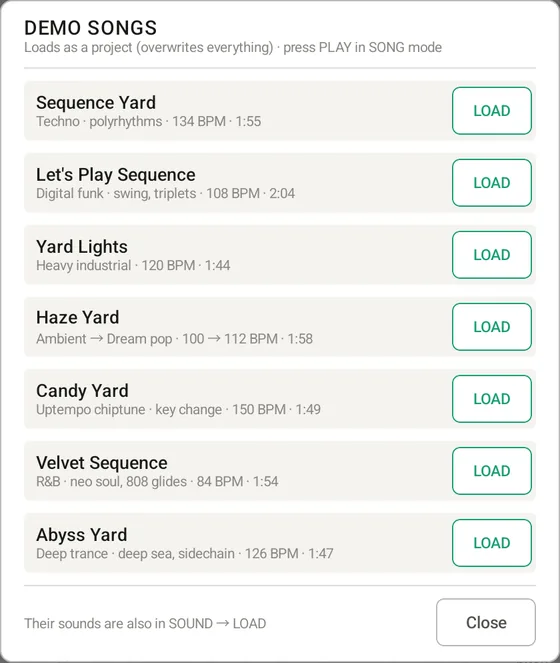
LOAD → “Demo songs…” loads seven songs made only with DBR-1's own features. Press PLAY to hear them all the way through (PLAY mode is SONG). You can watch how they are built while they play: automation (AUTO), FX scenes, per-pattern tempo, basslines made with pitch locks and more.
| Song | What it is |
|---|---|
| Sequence Yard | Techno (134 BPM). Mechanical sequences of different lengths (12, 10, 9, 7 and 5 steps) drift against the four-on-the-floor, with an acid line and dub chords (per-track length → 3) |
| Let's Play Sequence | Digital funk (108 BPM). Starts from a lone hi-hat and builds up part by part: kick and snare → slap bass → clav and brass → wah chords and a lead. Heavy SWING makes it bounce, with triplet conga, snare and brass (→ 3) and a cowbell and zap looping every 6 and 5 steps |
| Yard Lights | Heavy industrial (120 BPM). Like a stopped factory starting up: from a furnace drone and steam, distorted kicks, rumble, metal being crushed and torn, and a grinding bass pile up. A drop that starts with a hammer blow, a half-time stomp section, a machine and a chain looping every 12 and 7 steps (per-track length), and build-ups that tighten into 1/16T |
| Haze Yard | Ambient (100 BPM) → dream pop (112 BPM). Minimal, poppy sequences of different lengths (an arpeggio, stars and blips looping every 12, 7 and 5 steps) scattered across a vast, ocean- or space-like reverb, with a tape-like wobbling delay |
| Candy Yard | Uptempo chiptune (150 BPM). Every sound is made like an old game console's sound chip: only pulse waves, a triangle wave and noise, with 16 volume levels and pitch that moves in 1/60-second steps. Fast arpeggios play the chords, moved with pitch locks. The lead has an echo 3 steps behind, a "pickup" blip loops every 5 steps (per-track length), a tom rolls in 1/16T, and the final chorus jumps up a whole step |
| Velvet Sequence | R&B / neo soul (84 BPM). Opens with vinyl crackle and a muffled electric piano, then a lazy, swung groove (SWING 28), an 808 bass whose pitch glides along a drawn line (AUTO), a tremolo electric piano (a pan line), an "ooh" choir and a smooth lead. The second verse rolls its hi-hats in 1/16T |
| Abyss Yard | Deep trance inspired by the deep sea (126 BPM). It dives in from a low, pressure-like rumble and sonar pings. A low, round kick, dark hi-hats and a rolling bass deep down are joined by a stab looping every 6 steps and water drips every 7, drifting against each other in a hypnotic groove, with bubbles and a distant whale. The breakdown opens up a progression of dark pads, a swell rising toward the surface and a 1/16T clap roll lift it into the full mix, and at the end it sinks away behind the low-pass filter. A sidechain from the kick (FX → MASTER) makes it pump slowly |
- A demo song loads as a project, so it replaces all patterns, the kit and the BPM (you are asked first, and ↶ brings them back). Save your work first if you want to keep it.
- The 112 sounds of the songs are also in the SOUND tab's LOAD list (DEMO · song name), ready for your own tracks. The demo songs stop at the end (→ ONCE in the SONG tab).
Swiping
- Swipe sideways to set several steps of one track at once, every SWIPE interval (1/16, 1/8, 3/16, 1/4, 1/2). On a triplet track the interval keeps the same time where the cells allow it (1/8 = half a beat, 1/4 = 1 beat, 1/2 = 2 beats) and otherwise uses the nearest triplet length (1/16 → 1/16T, 3/16 → 1/4T). On a 1/16T track, 1/8 lights every third cell. On a 1/8T track half a beat does not fit the cells, so 1/16 and 1/8 both light every cell.
- Swipe up or down to set the same step on several tracks at once.
- With GAPS on, steps inside the swipe that are off the interval are cleared.
- If the first step was off, the swipe turns steps on; if it was on, it turns them off. One swipe is one undo.
Velocity
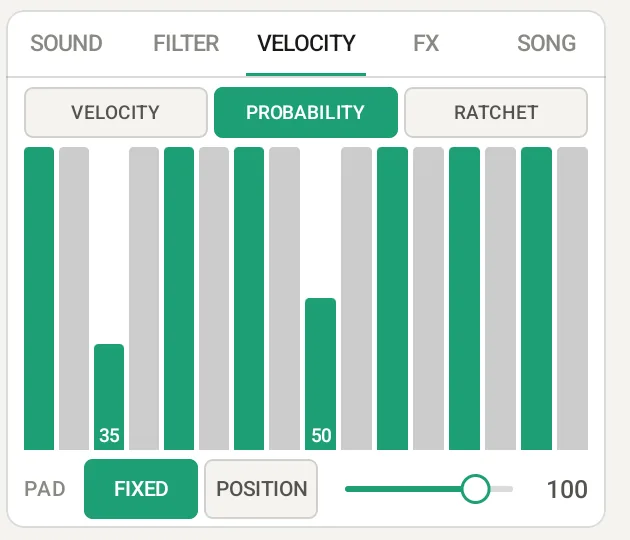
Long-press a step until it vibrates, then drag up or down to set its velocity (0–127). Move slowly for fine steps; faster moves change it more (the mixer's EQ knobs work the same way). The VELOCITY tab edits all 16 steps of the selected track at once.
Probability and ratchets
The three buttons at the top of the VELOCITY tab choose what the bars edit. Each is a per-step value of the selected track, saved with the pattern (↶ undoes it).
| Button | What it does |
|---|---|
| VELOCITY | How hard the step plays (0–127) |
| PROBABILITY | The chance that the step plays (0–100%, in 5% steps). The phrase changes a little every time, so a pattern stays fresh. Steps below 100% get a triangle in the top-right corner |
| RATCHET | Splits one step into 1–4 hits (fast hi-hat runs and rolls). Steps with 2 or more get dots along the top. On swung steps and triplet tracks, the hits divide that step's own length |
Length and pages
Tap LEN to open a menu and set the pattern length from 1 to 64 steps (1 step = a 16th note): − / + change it by one, and buttons pick common lengths (picking one closes the menu). A longer pattern is filled by repeating what is already there.
Buttons 1–4 choose the page on screen (a dot marks the page that is playing). Long-press a page to copy / paste / clear it (all A/B tracks).
With FOLLOW on, the page on screen follows the playhead during playback (for live play). With it off, the page you chose stays put (for programming).
Swing
Drag SWING sideways (0–100). The off-beat 16th notes are delayed for a shuffled feel. Swing is saved per pattern.
3. Track options
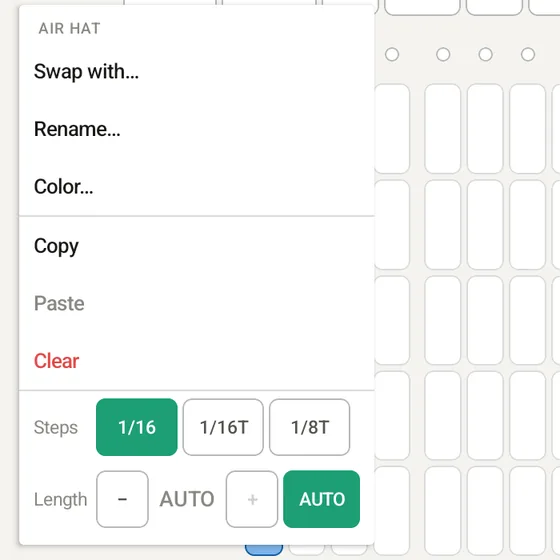
| Item | What it does |
|---|---|
| Swap with… | Pick any of the 16 tracks to swap everything: sound, name, color, settings and the steps of all patterns |
| Rename… | Rename the track (pad), up to 16 characters |
| Color… | Pick the track (pad) color from 20 colors, or make your own with Other…. The pad, steps, name and SOUND tab change color |
| Copy / Paste / Clear | This track's steps in this pattern |
| Steps | How long one step is: 1/16 (normal) / 1/16T (16th-note triplets, 24 cells per page) / 1/8T (8th-note triplets, 12 cells per page). See below |
| Length | A length for this track only (1 up to the pattern length, AUTO = follow the pattern). Mixing lengths makes polyrhythms. Shortening the pattern also shortens longer tracks (only when Steps is 1/16) |
- S (solo) plays only the soloed tracks of the bank. M (mute) silences a track.
- ALL S / ALL M switch the whole bank on screen (if any is on, all go off; otherwise all go on).
- Tapping a track name does not play a sound, so you can select tracks while performing.
- The color belongs to the kit, like the name. It is saved in project and kit files and can be undone with ↶. Swap with… moves the color along, and LOAD → "Built-in kit" restores the original colors.
Triplets (Steps)
Use Steps in the track-name long-press menu to turn a single track into triplets. A triplet track shows 12 cells (1/8T) or 24 cells (1/16T) across one page (one bar), with 3 or 6 cells per beat, so you can line it up by eye with the 16th notes on the other tracks. 1/8T or 1/16T appears under the track name.
- When you switch, existing notes move to the nearest cell in time (locks are cleared; Undo brings them back). Drawn automation is kept, as it is stored in time.
- SWING only delays the off-beat 16ths; triplet timing does not change.
- REC records to the nearest triplet cell. The VELOCITY tab and automation locks also use the triplet cells.
- Works with odd time signatures (e.g. 14 steps of 7/8 in 1/8T is 10.5 cells long, so the 11th cell is cut in half as the pattern loops). Triplet tracks cannot use Length (their own loop length).
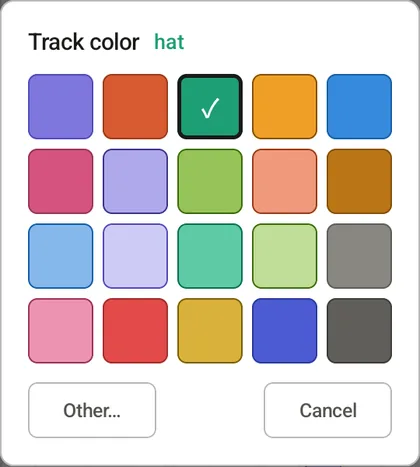
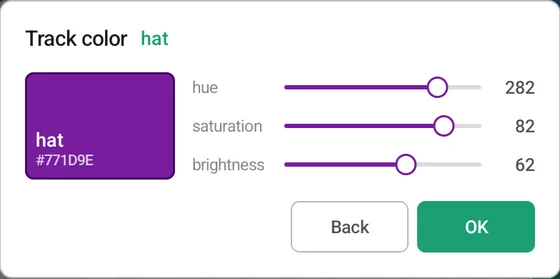
A color you made yourself appears next to Other… in the palette.
4. Pads and live recording
Hitting a pad plays its sound and selects that track (switching the bank if needed).
Recording
- Press REC so it lights up.
- Press PLAY. After a one-bar count-in (the position dots light red) recording starts. With the metronome on, you also hear clicks.
- Hit pads. Each hit is placed on the nearest step (the small delay you hear is corrected automatically).

- A hit in the last half step of the count-in goes on step 1.
- A hit at the very end of a bar, aimed at the next downbeat, goes on the first step of the pattern that plays next (a queued pattern or the next song row).
- Nothing is recorded while stopped, even with REC lit.
Pad velocity
Touch screens cannot sense how hard you press, so choose at the bottom of the VELOCITY tab: FIXED = always the same velocity (set with the slider), POSITION = louder toward the top of a pad, softer toward the bottom.
5. Shaping sounds (SOUND / FILTER)
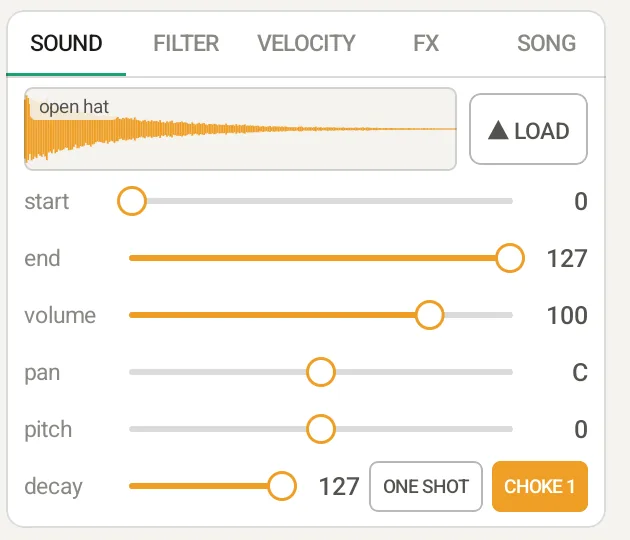
| Item | What it does |
|---|---|
| LOAD | Opens the sound browser (SOUNDS) to replace the selected track's sound (→ Sound browser below) |
| start / end | Which part of the sample plays |
| volume / pan | Level and left-right position |
| pitch | −12 to +12 semitones (the length changes too) |
| decay | How the sound fades (127 = play to the end) |
| ONE SHOT / GATE / BAR | Play mode (tap to change). ONE SHOT = play to the end, GATE = stop after one step, BAR = stop at the end of the pattern. Handy for long loops and vocals that should stop with the bar |
| CHOKE | Choke group (tap: OFF → 1 → 2 → 3 → 4). When any track in a group plays, the other tracks in that group stop within about 5 ms. Put the closed and open hi-hat in the same group and the closed hat cuts the open hat's ring, like a real hi-hat. Saved with the kit |
Sound browser (LOAD)
Opens the sound browser (SOUNDS), where you find a sound for the selected track (shown at the top left as "→ A01 …").
Top tabs: USER (your own sounds: the audio files in DBR-1/Samples and the sounds in DBR-1/Sounds) / PRESET (the 52 built-in sounds: BANK A / BANK B / EXTRA / POP / TRANCE) / DEMO (the demo songs' sounds, by song).
USER tabs: after ALL and UNSORTED (sounds in no tab) you can make your own tabs and sort sounds into them (+ TAB to add; long-press a tab to rename, move or delete it — deleting a tab keeps its sounds). Choose a sound's tab with TAB ▾ on its row.
Each row: ▶ preview (plays the raw sound without loading it; tap again or ■ to stop) / name (tap to load it into the track; the browser stays open so you can compare) / category (KICK, SNARE, HAT, …; tap to choose, or New category… for your own name; a sound without one shows a faint guess from its name) / KEY (the pitch, e.g. E2 or C#5; chords such as Dm9; UNKNOWN for drums, ambience and noise without a clear pitch. Built-in sounds show the note they were made at; your own sounds show, faintly, the key DBR-1 detected by listening to them — they are checked one by one the first time, "…" while in progress. Tap it to open the key picker: a tuner (detected note, offset in cents, frequency) with Use … for the suggested key, OCTAVE and 12 note buttons, UNKNOWN, Chord / other… to type a chord, and Auto to clear your key and go back to the detected one. Keys you set are shown in a strong colour) / format (WAV, MP3, AIFF, …; DBRSND = sample plus settings) / rating ★1–5 (tap the same star again for 0) / for USER, ⋯ to share or delete.
Filters: Search (name, category or group; a key only on an exact match such as C#5) / CATEGORY / FORMAT / ★ (n stars or more) / SORT (list order, name, rating, category, key from low to high, newest).
Bottom row (⋯ on phones): From file… (a file on the device or in the cloud) / ● Record… (from a microphone, an audio interface or DBR-1 itself; slicing and time stretch are here too → below) / ✦ GENERATE… at the top right (build a sound from waveforms → below) / Save this sound… (saves the selected track's sound — sample plus settings such as filter, INSERT and EQ — in DBR-1/Sounds; if a USER tab is open, it goes into that tab) / Change folder (in USER; pick the save folder again). Loading a .dbrsnd asks first. Undoable.
Pitched built-in sounds show their note (e.g. D5; A4 = 440 Hz, middle C = C4) and chord sounds their chord name (e.g. Dm9); a ~ (cowbell, conga) marks a percussive sound's nearest note.
Preview plays the raw sound (the track's pitch, filter and FX are not applied). Categories, ratings and tabs are also copied to DBR-1/sound_library.json in your save folder, so they come back after reinstalling
Supported audio files
| Item | Spec |
|---|---|
| Formats | WAV, AIFF, MP3, M4A (AAC), OGG, FLAC |
| Sample rate | 8–192 kHz |
| Length | Up to 60 seconds each (only the first 60 seconds of a longer file are used) |
| Stereo | Mixed down to mono |
“Built-in kit” in the LOAD menu returns all 16 tracks to the built-in sounds (patterns are kept).
Making your own sounds (GENERATE)
Tap ✦ GENERATE… at the top right of the SOUND tab's LOAD screen (✦ GEN on phones) to build a sound from waveforms. The result goes to the sampling screen, and from there into the selected track. Use it when the presets don't have what you need, or to quickly make basses, chords, pads and drums.
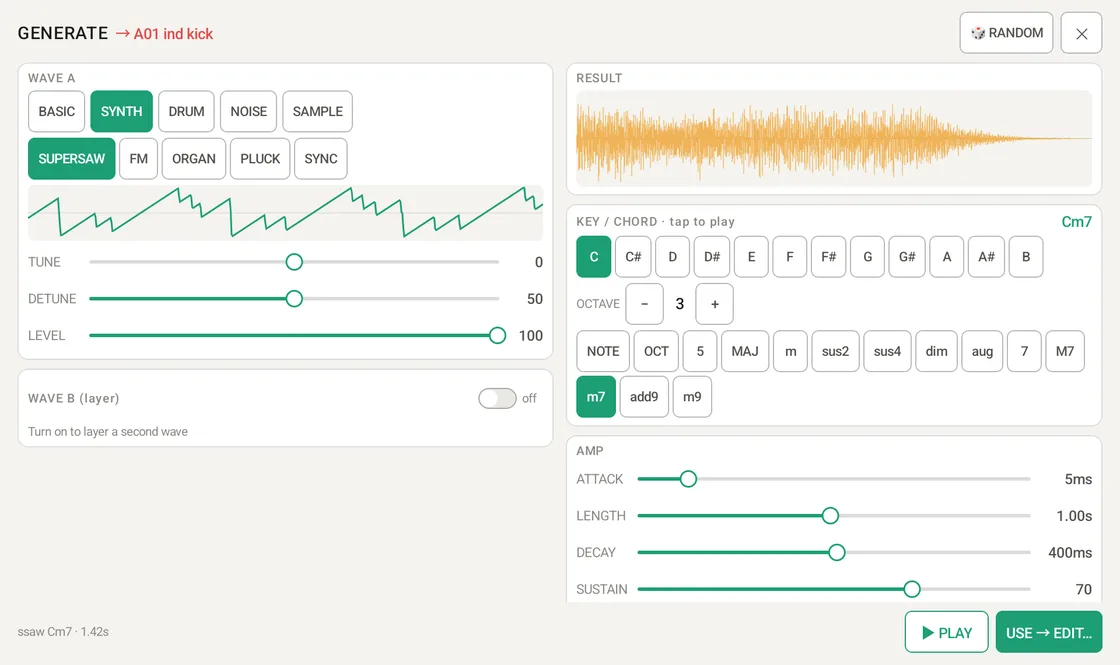
The screen doesn't scroll: tabs on the left switch pages (tablet = WAVE A · B / KEY · AMP · FILTER; phone = WAVE A / WAVE B / KEY / AMP / FILTER, so your left hand picks the tab and your right hand works the controls). The top row shows the finished sound's waveform, name and length, plus 🎲 RANDOM, ▶ PLAY, HOLD and USE → EDIT…. With HOLD on, the sound keeps repeating; move the filter or anything else and it switches to the new sound at the same position, so you can tweak while listening (tap again or PLAY to stop).
RESET on WAVE A / B, AMP and FILTER returns that panel to its defaults. KEY is a keyboard (the chord tones light up too) with + / − for the octave on the right, and the chord is written on a grand staff (below on tablets, on the right on phones; root position only, no inversions; notes are spelled by interval, e.g. Cm7 = C, E♭, G, B♭).
- Pick the main wave in WAVE A: BASIC (SINE / TRI / SAW / SQUARE / PULSE), SYNTH (SUPERSAW / FM / ORGAN / PLUCK / SYNC), INST (acoustic-style sounds: PIANO / E.PIANO / GUITAR / BASS / STRINGS / MARIMBA / VIBES / BRASS / FLUTE / CHIME), DRUM (KICK / SNARE / CLAP / HAT / TOM / RIM / BELL / ZAP), NOISE (WHITE / PINK / BROWN) or SAMPLE (any of the kit's 16 sounds, or a sound in the Samples folder, including your recordings)
- Turn on WAVE B to modulate wave A with a second wave, or to layer it (choose at the top right). FM (default) = B wobbles the phase of A (metallic, bell-like, growling tones; B's TUNE changes the character) / RING = A times B (ring modulation) / AM = B moves the volume of A / LAYER = play both (e.g. a SINE an octave below a SAW, or noise on a kick). With FM, RING and AM you don't hear B itself, and its LEVEL becomes the depth (DEPTH). Works with any pair of waves (drums and samples can be modulated too)
- Set TUNE (±24 semitones), SHAPE (its meaning depends on the wave: FOLD = wavefolding, WIDTH = pulse width, DETUNE = supersaw spread, INDEX = FM depth, DRAWBAR = organ harmonics, DAMP = string damping, SYNC = sync amount, TONE = brightness, BARK = e-piano bite, ENSEMBLE = string spread, HARD = mallet hardness, TREMOLO = vibes tremolo, BRIGHT = brass brightness, BREATH = flute breath, DECAY = drum length, START = sample start) and LEVEL for each (NOISE has no TUNE)
- Shape it with AMP (ATTACK / LENGTH = how long the note is held / DECAY / SUSTAIN / RELEASE), FILTER (OFF / LP / HP / BP, CUTOFF, RESO, ENV = how far the envelope moves the cutoff, ENV DEC) and DRIVE (distortion)
- In KEY / CHORD, pick the note (C–B, OCTAVE 1–6) and a single note (NOTE) or chord (OCT / 5 / MAJ / m / sus2 / sus4 / dim / aug / 7 / M7 / m7 / add9 / m9): the sound plays right away. ▶ PLAY plays it again
- When you like it, tap USE → EDIT…. On the sampling screen check the range, name and KEY (the note or chord name is filled in), then Use on … puts it on the track (also saved as a WAV in Samples)
🎲 RANDOM picks random waves and settings and plays the result (the key and chord stay). A fun way to start from something unexpected.
The same settings always give the same sound. Settings are kept until you quit the app, so you can close the screen and carry on later. Samples are tuned to the key from their detected pitch (C4 if it can't be found).
Recording your own sounds (sampling)
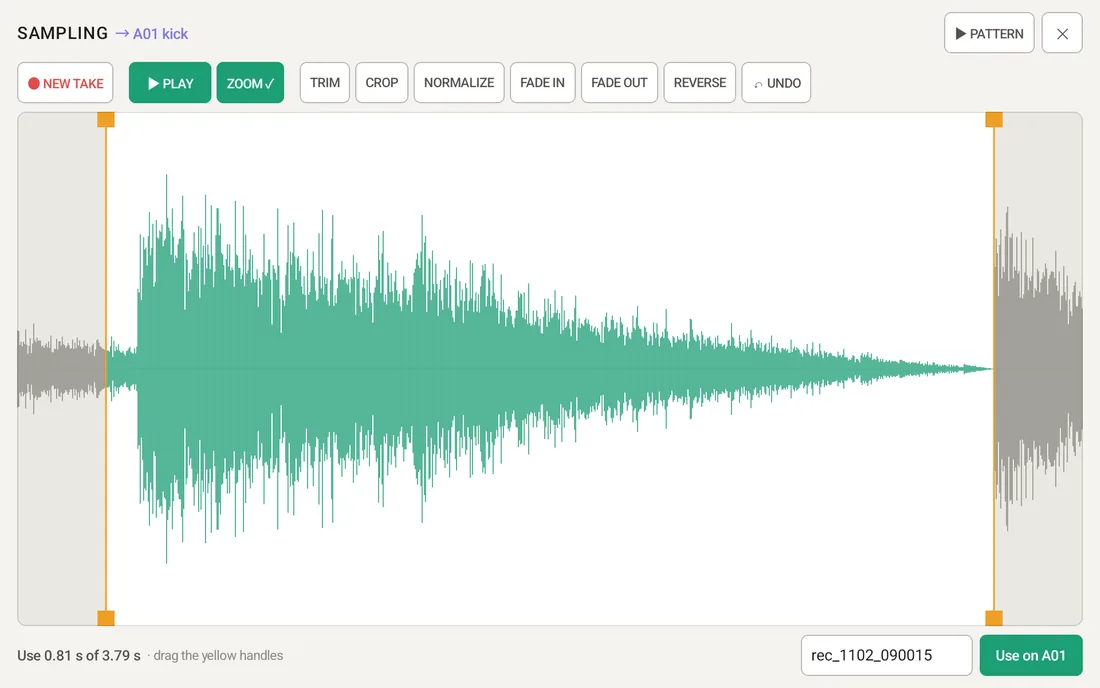
LOAD → “● Record (mic / audio input)…” in the SOUND tab records from a microphone or an audio interface and puts the sound on the selected track. The first time, Android asks for permission to use the microphone (it is used only on this screen, and recordings never leave your device). Recording DBR-1 itself (resampling), cutting a rhythm onto separate pads (slicing) and changing the length (STRETCH) are also done on this screen.

- Choose the input: IN selects the built-in mic or a USB device (audio interface etc.). CH picks the channels to record: L+R / L / R on stereo devices; on devices with 3 or more channels, 1+2 / 3+4 / … (two channels mixed) or 1 / 2 / … (a single channel). Check the level on the meter (red at the right end means the sound is clipping or about to). When the surroundings are loud or the sound is too hot, lower the recording level with LEVEL to the right of the meter (−30 to +12 dB, default 0 dB; quiet sounds can be raised). It applies to the meter, the AUTO trigger and the recording, can be changed while recording, and is kept on the device.
Android does not let apps change the microphone's own sensitivity, so LEVEL scales the sound after it arrives. A sound loud enough to distort in the microphone itself stays distorted when you lower LEVEL (move away from the mic instead). - Record: ● REC starts and ■ STOP ends the recording (up to 60 seconds). With AUTO (-40 / -30 / -20 dB), ● ARM waits and starts recording when the sound goes over the line on the meter (the 0.1 s before it is kept; the first 0.4 s after ARM is ignored so the tap itself does not start it. If noise alone is over the line, raise the AUTO line (-40 → -30 → -20 dB)). ▶ PATTERN plays the pattern while you record.
- Edit: drag the yellow handles on the waveform to choose the part to use (drag elsewhere to make a new selection; tap to move the nearer handle there).
| Button | What it does |
|---|---|
| ▶ PLAY | Plays the selection |
| ZOOM | Zooms in on the selection for fine adjustment (on the start when everything is selected). Pinch the waveform with two fingers to zoom, drag with two fingers to scroll. A seconds ruler along the bottom gets finer as you zoom in (down to 1 ms). While zoomed, a scroll bar under the waveform shows the whole recording and a frame for the part you are viewing: drag the frame to move, or tap elsewhere on the bar to jump there |
| TRIM | Cuts the silence at the start and end |
| DENOISE | Reduces steady background noise (air conditioning, fans, hiss). It learns the noise from the quietest parts of the recording, so leave a little silence before or after the sound. It works gently to keep the decay of the sound; press again for more (the sound thins out too; UNDO goes back) |
| CROP | Keeps only the selection |
| NORMALIZE | Raises the level of the selection so its loudest point is near full scale (if it already is, you see “Already at full level”) |
| FADE IN / FADE OUT | Fades the selection in / out |
| REVERSE | Reverses the selection |
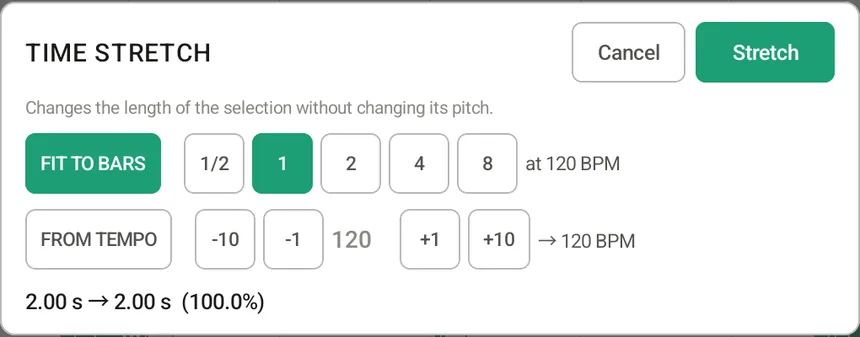
| STRETCH | Changes the length of the selection without changing its pitch (time stretch). FIT TO BARS (1/2 / 1 / 2 / 4 / 8 bars) makes it exactly that many bars at the current tempo; FROM TEMPO converts from the tempo it was recorded at (a guess is filled in) to the current tempo. 50–200%. Large changes make the sound waver. It may take a moment (WAIT…). UNDO goes back |
| ↶ UNDO | Undoes the last edit |
| RATE / BIT | (bottom row) Lowers the sample rate (samples per second: as recorded / 32k / 26k / 22k / 12k / 8k) and bit depth (16 / 12 / 8) when the sound goes onto the track, for a gritty vintage-sampler sound. PLAY lets you hear it first; the recording itself is not changed |
| ● NEW TAKE | Records again (discards the current take) |
KEY in the bottom row is a tuner: it checks the pitch of the selection and shows e.g. "KEY E2" or "KEY A3 −12¢" (UNKNOWN if there is no clear pitch). Tap it to choose another key in the key picker. When Use on A01 saves the sound to DBR-1/Samples, this key goes into the KEY column of the sound browser.
Give it a name and press Use on A01 (the selected track): the selection becomes that track's sound. If a save folder is set, it is also saved as a WAV in DBR-1/Samples so you can use it in other projects. ✕ closes the screen without using the recording.
Recording DBR-1 itself (resampling)
Choose DBR-1 output (resample) in IN to record what DBR-1 is playing, as you hear it (after the effects, MASTER and the master filter). Use it to turn a pattern into a single loop, or to make a new sound from an effected one (no microphone permission needed).

- BARS (OFF / 1 / 2 / 4 / 8): choose a number of bars and press ● REC N. The pattern starts from the top and exactly that many bars are recorded from its first sound, then it stops (worked out from the current tempo, so the result loops cleanly). A bar counts as 16 steps (4/4). When BARS is on, the length it will record (e.g. "1 BAR = 16 steps (4/4) at 120 BPM → records 2.00 s") is shown below REC. If the pattern length does not fit whole bars (12 steps, for example), or the tempo comes from MIDI clock, the take may not end where a loop ends, and an orange note says so; trim the take afterwards.
- PAD (OFF / A01–B08): choose a pad and press ● REC PAD. The pattern stops, that pad plays once (at full velocity) and everything from that moment until the sound dies away (including effect tails) is recorded, then it stops by itself (cut once it stays below −60 dB for 0.3 s; up to 10 s). Use it to turn a sound with its effects, filter and EQ into one new sound. While a PAD is chosen, BARS / AUTO are not used.
- With BARS off it works like a normal recording: ● REC to ■ STOP (AUTO also works). You can record ▶ PATTERN or your own pad playing.
- It cannot be used while a live recording (RECORD in Export) is running.
Slicing (cut a recording onto separate pads)
Cut a recorded rhythm into its hits and put each one on its own track (pad). Open it with SLICE ▸ at the right end of the edit row (the part between the yellow handles is sliced).
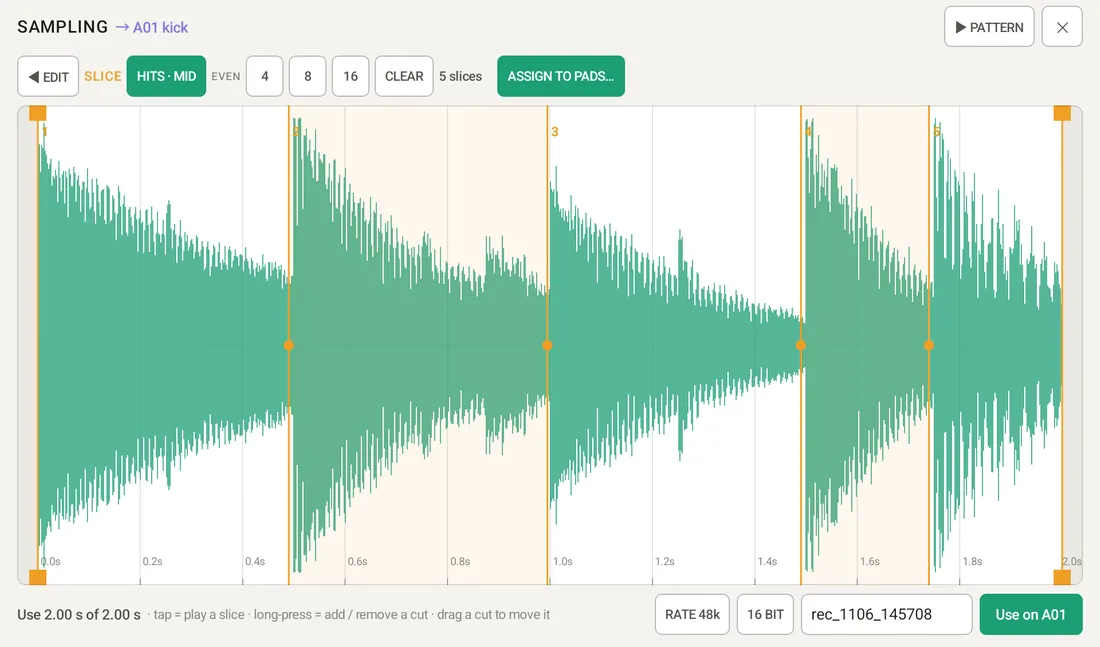
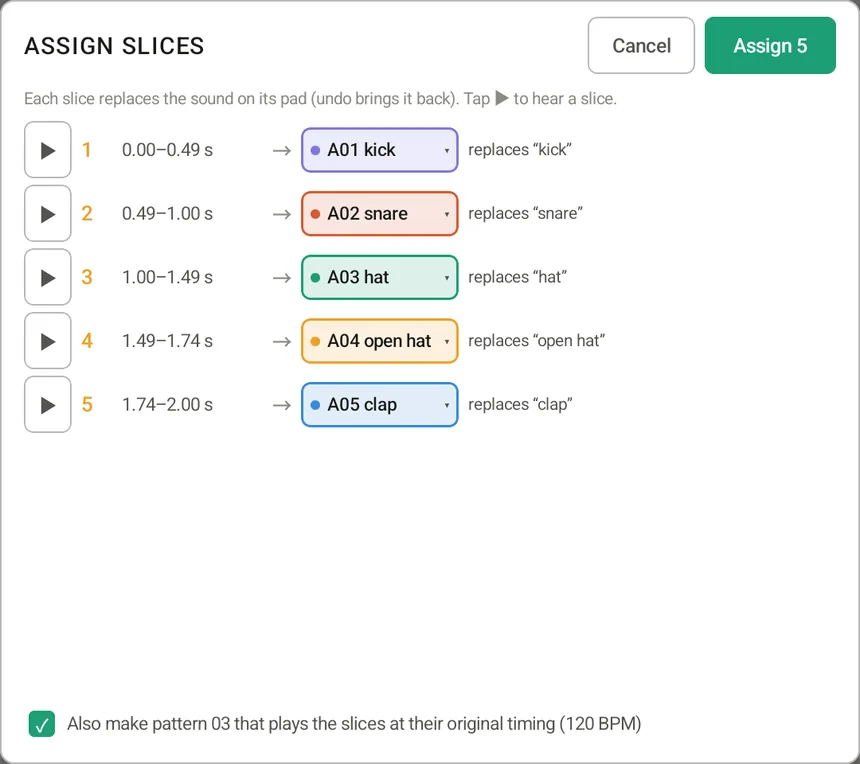
- When it opens, cuts are placed automatically at the start of each hit (kick, snare, …). Each press of HITS · LOW / MID / HIGH changes the sensitivity (HIGH cuts finer).
- EVEN 4 / 8 / 16: cut into equal parts (to split a loop by beats). CLEAR: remove all cuts.
- Tap the waveform to play that slice, long-press (vibrates) to add a cut (or remove the cut under your finger), drag a cut to move it. Up to 16 slices.
- ASSIGN TO PADS… opens a confirmation screen. For each slice, listen with ▶ and choose the track it goes to (by default, from the selected track onward; "Don't use" skips it). The sound it replaces is shown, and if two slices go to the same track they turn red and you cannot assign.
- Tick "Also make pattern NN…" to create, in an empty pattern, a pattern that plays the slices in their original rhythm (placed on the nearest steps at the current tempo).
- Each slice is saved as its own WAV (name-1, name-2, …), also in DBR-1/Samples if a save folder is set. The receiving tracks' sound settings (volume, pan, pitch, filter, INSERT, EQ…) go back to their defaults (track colour, mute and solo stay). ↶ (UNDO in the header) undoes the whole assignment.
FILTER tab
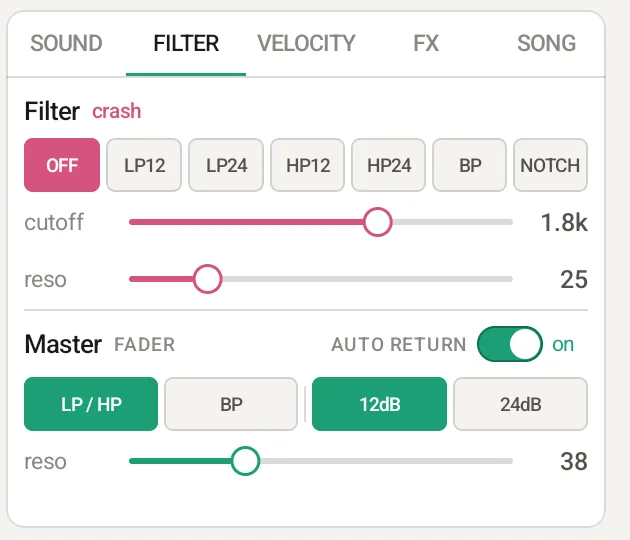
- Filter (selected track): OFF / LP12 / LP24 / HP12 / HP24 / BP / NOTCH, cutoff and reso.
- Master (the FLT fader): LP/HP or BP, 12 dB / 24 dB, reso, AUTO RETURN (the fader springs back to the center when you let go).
Mixer (final levels and panning)
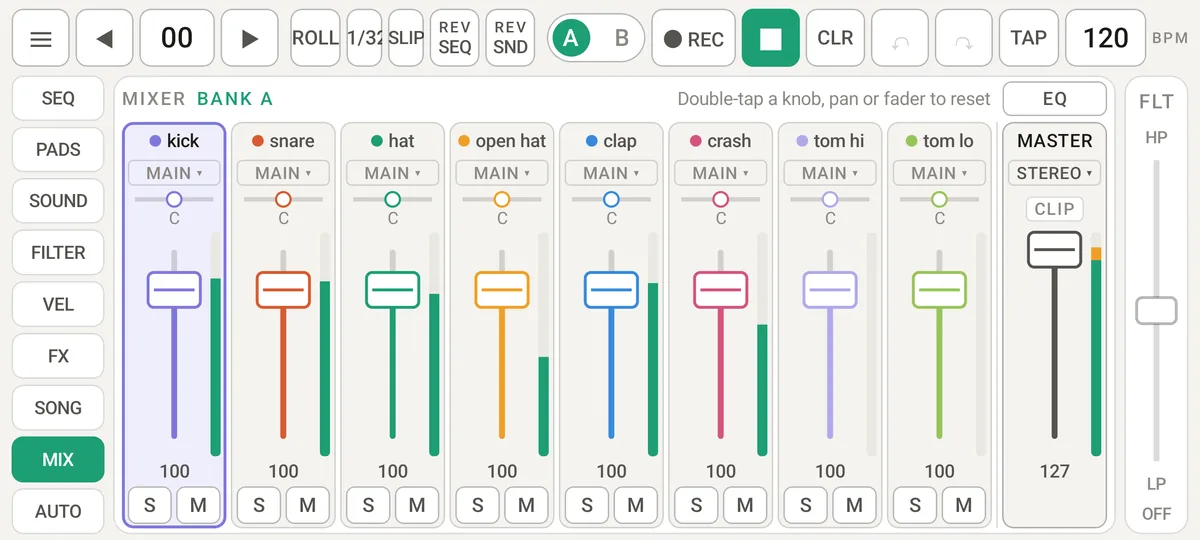
Shows the 8 tracks of the current bank plus MASTER so you can balance the whole mix in one place. On a tablet, MIX in the header switches between the step view and the mixer; on a phone, open MIX on the left. Use BANK A / B for the other bank.
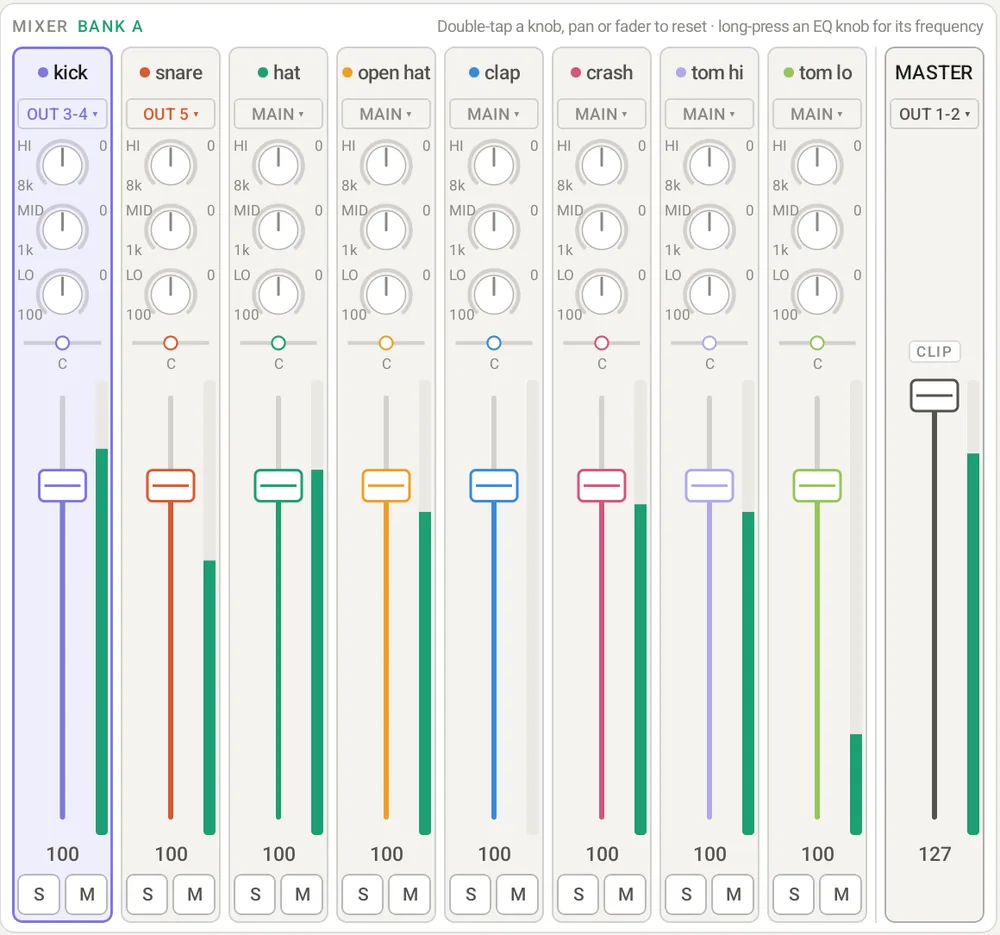
| Part | Action | What it does |
|---|---|---|
| Track name | Tap | Selects the track (no sound) |
| EQ (HI / MID / LO) | Drag up/down / double-tap / long-press | Boost or cut highs (8 kHz and up by default), mids (around 1 kHz) and lows (100 Hz and below) by up to ±12 dB. Drag up to boost; double-tap for 0. Long-press (vibrates) for a slider that sets the band's frequency (LO 30–500 Hz, MID 200 Hz–8 kHz, HI 2–16 kHz; Reset for the default). The frequency is shown at the knob's bottom left, in the track's color once changed. For example: LO at 60 Hz on the kick to add weight only, or MID around 3 kHz on the snare to bring out the attack. On a phone, tap EQ at the top right to show the knobs in place of the faders |
| pan | Drag sideways / double-tap | Left–right position. Double-tap for C (center) |
| Fader | Drag up/down / double-tap | Volume (0–127). It moves by how far you drag, not to where you touch. Double-tap for 100 (default) |
| Meter | — | The track's level (after volume and pan, before effects). Yellow above −6 dB |
| S / M | Tap | Solo / mute (same as S / M in the sequencer) |
| MASTER | Drag up/down / double-tap | Overall volume (0–127, double-tap for 127). Its meter shows the output. A limiter just before the output automatically holds back peaks when sounds pile up, so the output normally does not distort; CLIP lights red only when it is far too loud even for that |
6. Effects (FX)
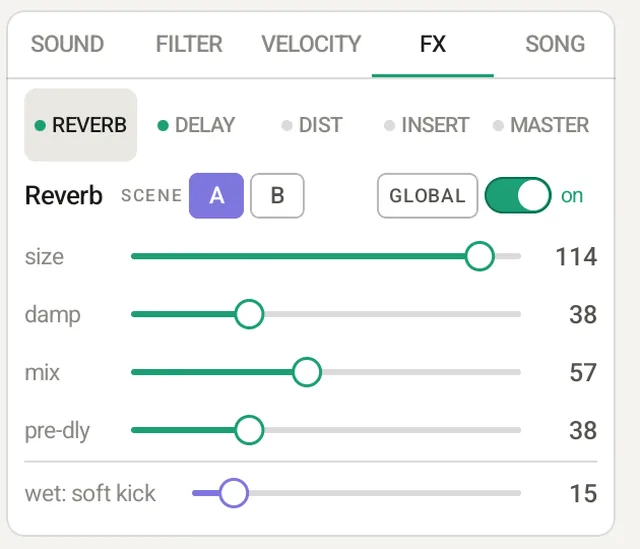
- At the top, choose REVERB (size / damp / mix / pre-dly), DELAY (time / fdbk / mix / sync), DIST (drive / tone / level), INSERT (an effect per track) or MASTER (sidechain and glue comp). A lit ● means it is in use.
- REVERB / DELAY / DIST each have an on / off switch; wet at the bottom is how much the selected track gets — the send level for REVERB / DELAY, the amount for DIST.
- DELAY sync follows the tempo (1/4 to dotted 1/8). Moving time switches to FREE (10 ms – 1 s).
- SCENE A / B (next to the REVERB / DELAY / DIST name): each pattern holds two complete REVERB / DELAY / DIST settings you can switch between while playing.
- GLOBAL (left of the on / off switch): when lit, all patterns share one set of FX (scenes A / B and every track's sends). Switching patterns while playing no longer changes the FX, and a change made in any pattern applies to all. Turning it on copies the current pattern's FX to every pattern (you are asked first if other patterns have different FX). Turning it off keeps the FX as they are, per pattern again. Saved with the project.
INSERT (an effect per track)
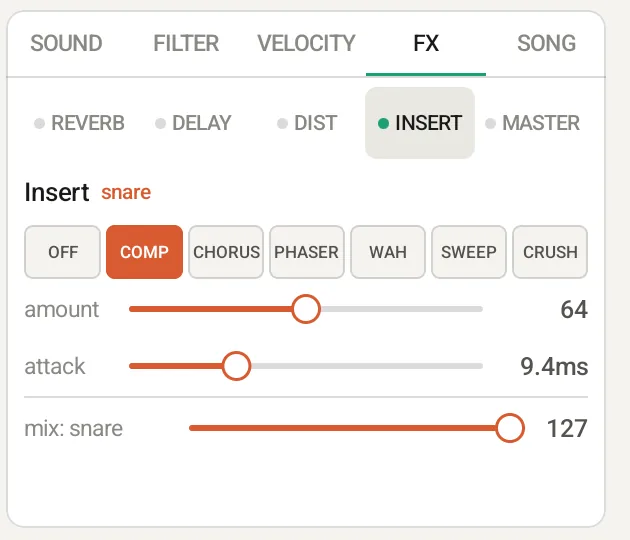
Each track can have one effect of its own. It comes after the filter and before DIST, and is saved with the sound (the kit). There are two knobs and mix (how much is blended with the dry sound). Choosing a type sets the knobs to good starting values.
| Type | Knobs | Use it for |
|---|---|---|
| COMP | amount · attack (0.5–30 ms) | Fatter kicks and bass, punchier snares. A longer attack keeps the hit. Level is made up automatically |
| CHORUS | rate (0.1–5 Hz) · depth | Widening pads, bells and chords |
| PHASER | rate (0.05–4 Hz) · depth | Swirling hats and synths |
| WAH | sens · reso | Auto-wah that opens with how hard the sound hits — funk bass and clav |
| SWEEP | rate (2 bars, 1 bar, 1/2, 1/4, 1/8, 1/16) · depth | A low-pass that opens and closes in time; it lines up at the start of playback |
| CRUSH | bits (16–3) · rate (48k–1.5 kHz) | Lo-fi grit, old-sampler style |
MASTER (sidechain and glue comp)
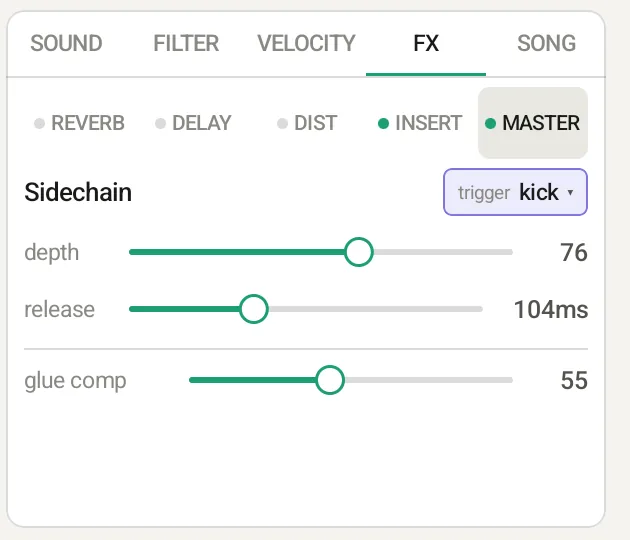
- Sidechain: each time the trigger track (a kick, say) plays, the other tracks dip by depth and come back over release (30–630 ms) — the house / techno "pump". It follows the hits instead of analysing the sound, so it is light; a muted trigger track does not duck.
- glue comp: gentle compression on the whole mix to glue it together (0 = off). It comes after reverb / delay and before the master filter.
- MASTER settings are saved with the project (not undoable, like the MASTER volume) and apply to exports.
7. Performance (ROLL / REV / filter / performance screen)

| Button | Action | What it does |
|---|---|---|
| ROLL | Hold | Repeats the chosen length from the nearest division before the press (an 8th note for 1/32, 1/16 and 1/8; the beat for 1/4 and longer), so pressing on a quiet off-beat step still repeats the strong step. The position on screen loops with it |
| 1/4 · 1/8 · 1/16 · 1/32 | Tap | Roll length. 1/4 = 4 steps, 1/16 = repeat one step, 1/32 = repeat at double speed |
| SLIP | On / off | What happens when you release ROLL. Off (default) = continue right after the rolled steps. On = jump to where the pattern would have been (it kept running underneath) |
| REV SEQ | On / off | Plays the steps backwards |
| REV SND | On / off | Plays samples backwards |
Master filter (FLT)
Move the vertical fader up from the center for a high-pass (thinner sound) or down for a low-pass (darker sound). Around the center it is off. Change its type in the Master part of the FILTER tab.
USER (move any parameters with the fader)
Each tap on the name above the fader (FLT) switches the fader through FLT (master filter) → USER1 → USER2 → … → FLT (USERs with nothing assigned are skipped). In a USER, the fader adds to or subtracts from the parameters you assign, all at once (for example: open the grinder's cutoff while deepening the reverb and pulling the kick down).
- Long-press it to open the assignments. Pick a USER with the tabs at the top; + USER adds one (USER1 to USER8). + Add adds a row; pick the target (one of the 16 tracks or FX / MASTER), the parameter and the amount (AMT: −100 to +100%) for each. Up to 16 per USER (enough for one on every track). The same parameter in several rows adds up. Delete removes that USER (the later numbers move up). Tap the name (USER1 etc. ✎) to give it a name of up to 5 letters (e.g. BUILD, DROP); it also shows above the fader. Leave it empty to go back to "USER" + number. The screen also opens if you switch to a USER with nothing assigned.
- The list scrolls. Buttons and sliders in it react when you lift your finger, so touching them to scroll does not select anything (change a slider by tapping or dragging sideways).
- Moving the fader up from the center adds the amount, down subtracts it (rows with a negative amount go the other way). At the end of the fader you get exactly the amount. It works on the current value (normal value, lock or line), so automation keeps moving; values stop at their limits.
- Below the fader you see how much is added (+ / −), or the number of assignments (×2 etc.) when it is at the center. With AUTO RETURN on (FILTER tab), the fader returns to the center when you let go. Switching the role removes the previous role's effect.
- The role and assignments are saved with the project (the fader position is not; undo does not cover them). Swapping tracks keeps the assignments on the swapped tracks. USER does not affect PATTERN / SONG exports; RECORD (recording your performance) captures it as you hear it.
Performance screen (PERF)
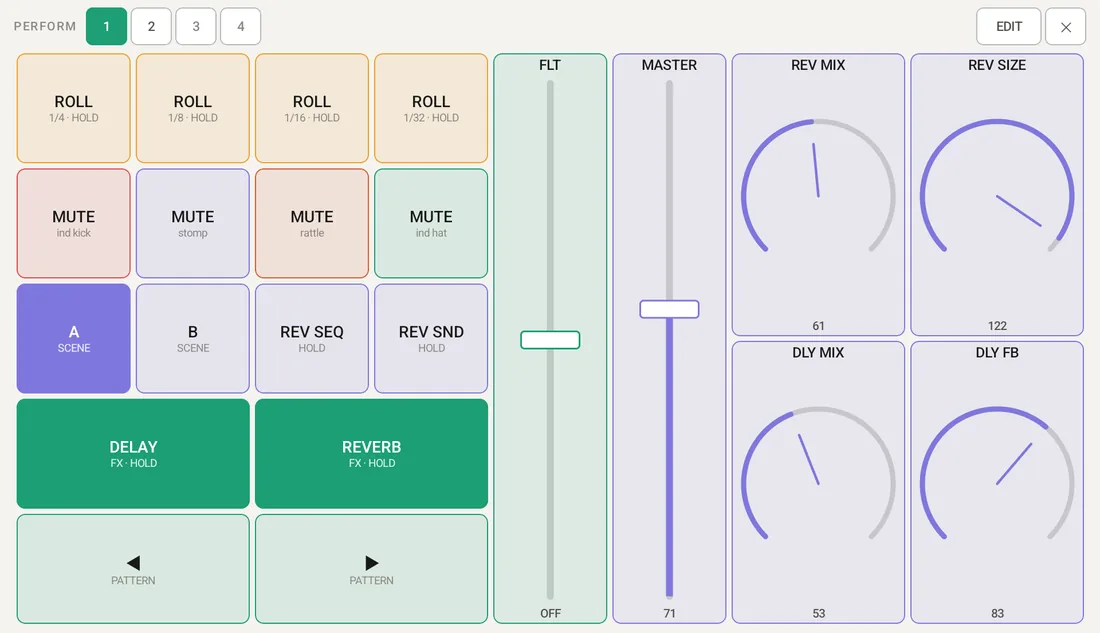
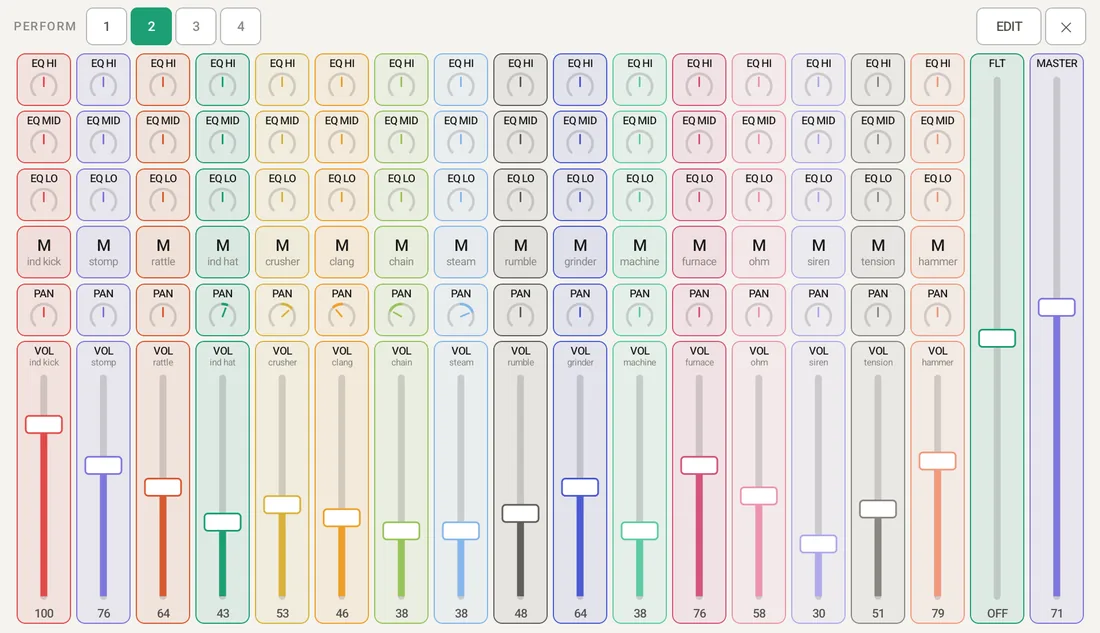
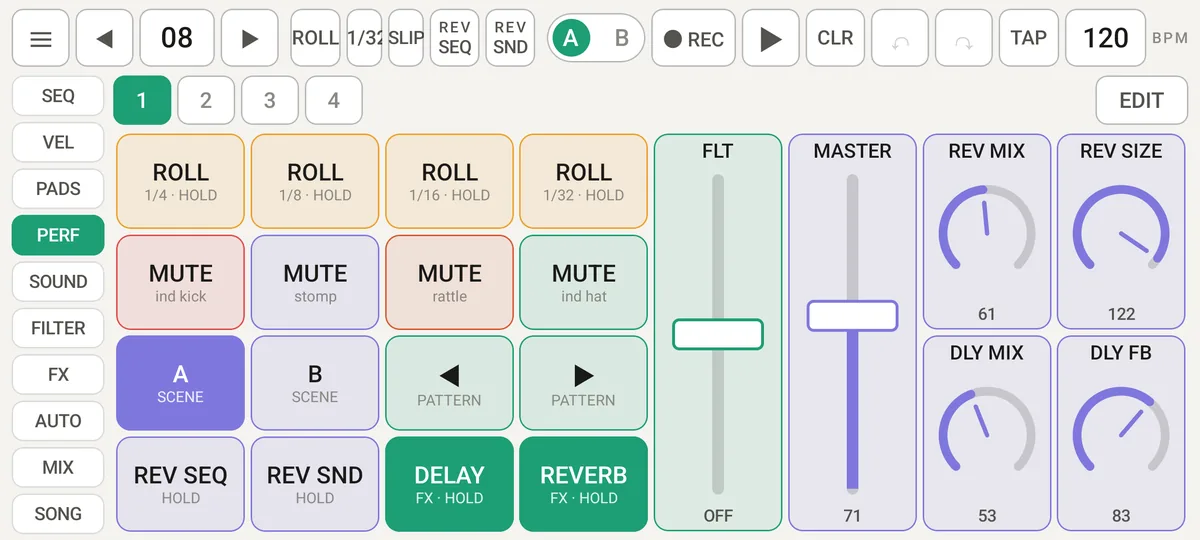
A screen for playing live while the sequence runs. Place buttons, faders and knobs of any size on an 18×10 grid to build your own performance surface. On tablets, open it with PERF above the pads; on phones, with the PERF tab on the left (below PADS). On tablets, ✕ at the top right goes back.
- There are 4 pages. The layout is saved on the device and stays the same whichever project you open (tablet and phone layouts are separate). Page 1 starts with 16 buttons on the left (ROLL, MUTE, scene, pattern, REV and FX), the FLT and MASTER (volume) faders in the middle and four reverb / delay knobs on the right. Page 2 is a 16-track mini mixer (one column per track: EQ HI / MID / LO knobs, mute (M), a PAN knob and a volume fader; FLT and MASTER on the right). "Default layout on this page" in EDIT's ⋯ menu brings back that page's first layout at any time (page 1's layout on pages 3 and 4).
Layouts made with earlier versions (8×4 grid) are stretched to fit 18×10. - A single cell is small for a button but just right for a fader; buttons are easiest to hit at about 2×2 cells. Small knobs drop text to leave room for the knob. While you touch a fader or knob, its name and value appear above it (readable even under your finger). A fader placed wider than tall turns horizontal (left = 0, right = max; centered values such as pan swing left and right from the middle). Double-tap to reset it to 0 (to the center for pan, EQ, pitch and other centered values, FLT and USER). On phones, a one-cell knob shows just the knob (no name or value) and a one-cell button uses small text.
- Each part can be touched with a different finger at the same time (hold ROLL while moving a fader, for example).
- The master filter fader is not shown on this screen; place FLT as a part wherever you like.
Arranging (EDIT): Press EDIT at the top right; empty cells show "+".
- Tap an empty cell → choose BUTTON / FADER / KNOB to add one (faders take 2 cells vertically).
- Tap a part to open its settings. Drag it to move it, and drag ◢ at its bottom right to resize. Parts cannot overlap or go off the grid.
- COLOR at the bottom of the settings sets the part's colour (Choose… = 20 colours or Other… for any colour, AUTO = the colour of its role or track, which follows track colour changes).
- ⋯ offers "Clear this page" and "Default layout on this page". DONE finishes.
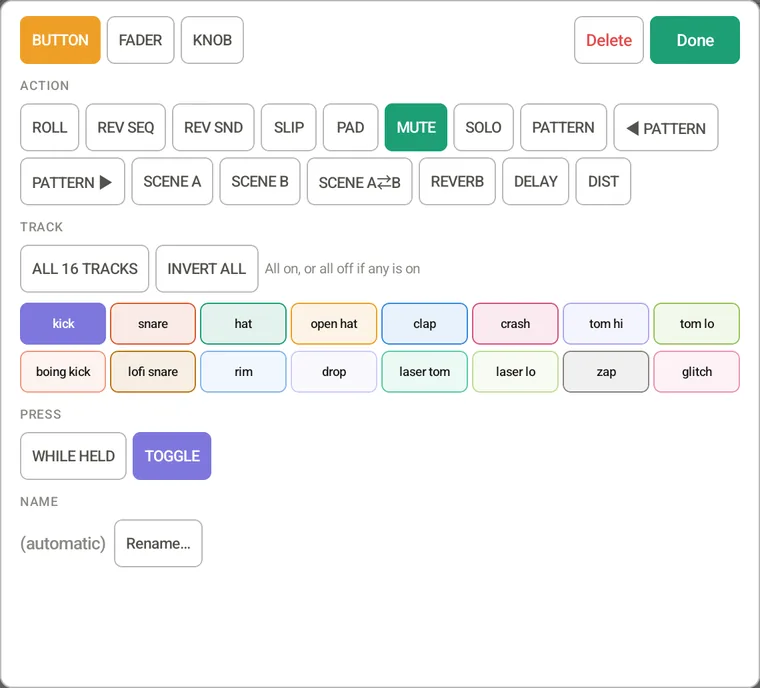
| Button ACTION | What it does |
|---|---|
| ROLL | Choose a LENGTH (1/4–1/32); repeats while held. Make one button per length if you like. With two held, the one pressed last plays; releasing it returns to the other |
| REV SEQ, REV SND, SLIP | Same as the performance buttons above |
| PAD | Plays the track's sound (recorded while REC is on; strength follows the pad velocity setting) |
| MUTE, SOLO | Pick one track under TRACK, or ALL 16 TRACKS (all on — or all off if any is on) or INVERT ALL (flips each of the 16 tracks on ↔ off) |
| PATTERN, ◀ PATTERN, PATTERN ▶ | Go to a set pattern number / the previous or next pattern. While playing, the change follows Pattern switch in the menu; a PATTERN button can set its own timing with SWITCH (while playing) (DEFAULT = follow the menu, the default / BAR / BEAT / NOW). With PRESS set to WHILE HELD, the pattern plays only while you hold the button and goes back to the previous one when you let go (unless you picked another pattern meanwhile; with NOW, a hold-to-play fill) |
| SCENE A, SCENE B, SCENE A⇄B | Switch the FX scene |
| REVERB, DELAY, DIST | Turn the effect on / off |
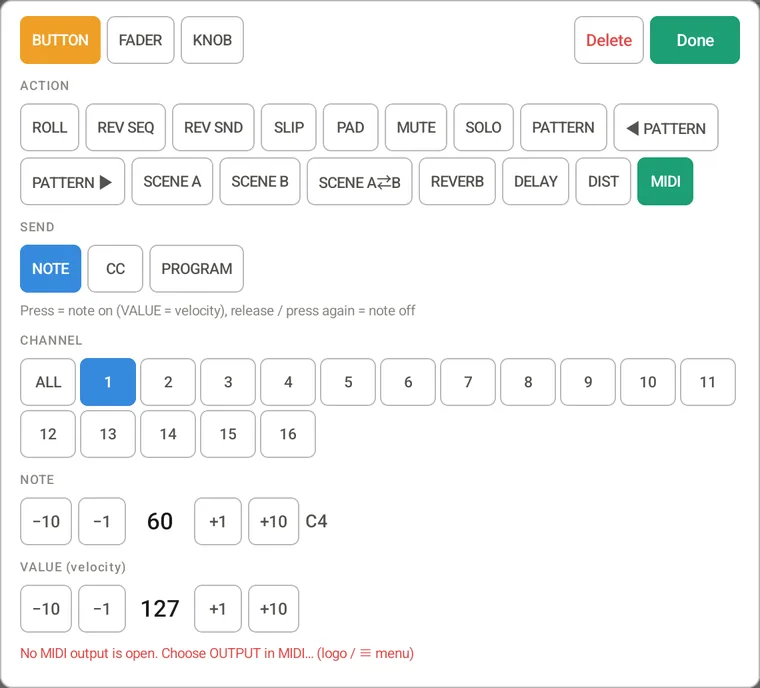
| MIDI | Sends MIDI to external gear (see "MIDI parts" below). SEND: NOTE (press = note on, release / press again = note off; VALUE = velocity) / CC (press = VALUE, release / press again = 0) / PROGRAM (a program change when pressed) |
PRESS: WHILE HELD = only while pressed (returns to the previous state on release), TOGGLE = switches on each press. NAME sets a name of up to 10 characters (empty = automatic).
| Fader / knob CONTROLS | What it does |
|---|---|
| FLT | Master filter (up = high-pass, down = low-pass) |
| USER | Adds / subtracts a USER1–8 assignment (→ USER). It adds up with the main fader's USER, and any number can move at once. Edit USER… opens the assignment screen |
| MIDI (external) | Sends MIDI to external gear. SEND picks the value format: CC 0–127 (bottom = 0, top = 127) / CC PAN (center = 64, shown L64 – C – R63, for parameters with a center such as pan) / PITCH BEND (14-bit, center = 0) / AFTERTOUCH (channel pressure 0–127) |
| PARAMETER | A single parameter. Under TARGET, choose SELECTED TRACK, a fixed track (17 parameters) or FX / MASTER (13 parameters) |
ON RELEASE: RETURN = goes back when you let go (FLT and USER to the center, a parameter to its value before you touched it), STAY = stays. Faders jump to where you touch; knobs turn by dragging up / down (or left / right). Move slowly for fine steps; the faster you move, the bigger the change (up to 4×), so one flick goes end to end.
MIDI parts
Parts for running external synths, effects, lights and so on with DBR-1 as the master. Choose MIDI as a button's ACTION, or MIDI (external) under a fader's or knob's CONTROLS.
- CHANNEL: the channels to send on. You can pick several (tap a number to add or remove it, e.g. 1, 3 and 10 get the same message). ALL = all 16 (tap again to go back to 1 only). The last one can't be removed. The part shows the numbers, e.g. "CH 1,3,10" or "CH 1-4,10" (1 to 4 and 10); with four or more groups it shows "CH 1,3 +3" (three more).
- CC NUMBER / NOTE / PROGRAM: the number to send (0–127). Notes also show their name (60 = C4).
- SEND TO: where to send. You can pick several (tap to add or remove, e.g. one control drives two synths at once). MIDI OUTPUT (default) = the device chosen as OUT in "MIDI…" (logo menu, or ≡ on phones). You can also pick any connected device per part. MIDI interfaces with several outputs list each port ("device · OUT 2"), so synth A can be on OUT 1 and effect B on OUT 2. If a part can't send (no output chosen, or the device is unplugged), its settings say so in red.
- ON RELEASE RETURN: CC and AFTERTOUCH go back to the value before you touched them; CC PAN and PITCH BEND go back to the center (like a pitch-bend wheel).
- Fader and knob positions are not saved (they start at 0, or the center for PAN / BEND). The same value is not sent twice in a row.
- These are sent separately from the sequence's MIDI output (OUTPUT CHANNEL in MIDI…), so you can play the sequence on an external instrument while turning knobs on another channel. Set MIDI clock to SEND to keep the gear at DBR-1's tempo.
8. Patterns and songs
- There are 100 patterns (00–99). Each holds steps, velocities, length, swing, tempo, effect settings and automation (the kit is shared).
- Changing the pattern while playing switches at the end of the bar (pattern) by default (the queued number is outlined). When stopped, it switches at once.
- Pattern switch in the logo menu (≡ on phones) sets when the change happens while playing (tap to go BAR → BEAT → NOW). BAR (default) = at the end of the pattern, starting the next one from the top / BEAT = on the next beat / NOW = on the next 16th step. BEAT and NOW keep the playback position and only swap the contents, so the groove never breaks (if the next pattern is shorter, it wraps at its own length). Together with the PATTERN buttons on the performance screen, you can play live with patterns.
- Long-press to copy / paste / clear a whole pattern. Copy FX only / Paste FX only copy just the effect settings (scenes A / B and sends) to another pattern, leaving its steps alone (↶ undoes it).
Song (SONG tab)
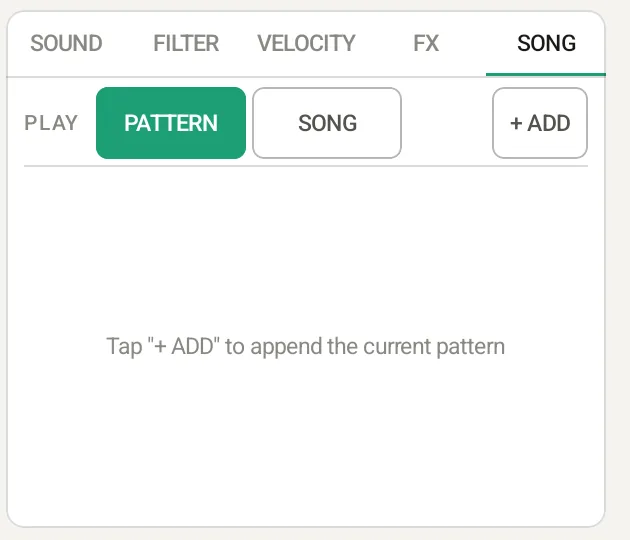
- + ADD appends the current pattern. Each row is “pattern × repeats” (up to 99 rows). ▲▼ reorder, ✕ deletes.
- With PLAY: SONG, PLAY plays the rows in order. The button next to it sets what happens at the end: ↻ LOOP = back to the top and repeat (default), → ONCE = play once and stop. This is saved with the project.
Automation (AUTO)
Volume, pan, filter, EQ, sends, effects, master volume and more can move within a pattern. On a tablet, tap AUTO in the header; on a phone, open AUTO on the left. Automation is saved with each pattern.
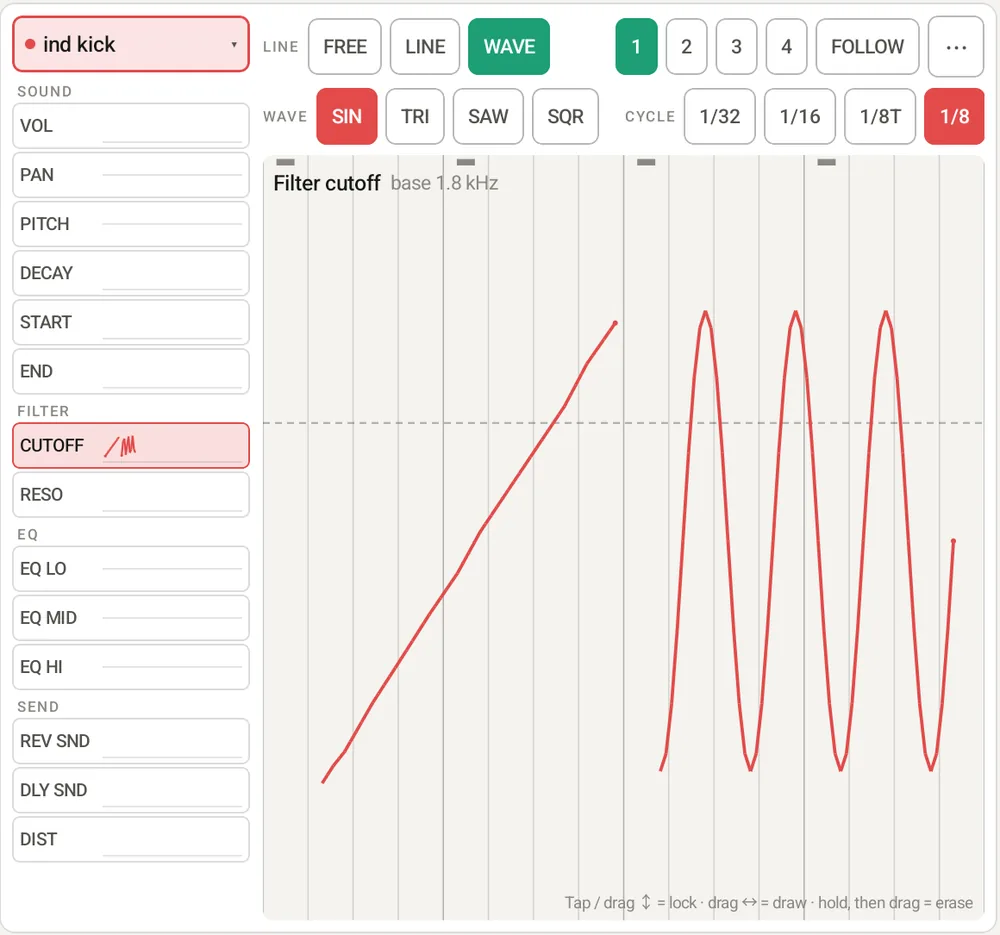
- Target: pick it from the list: a row at the top on tablets, a column on the left on phones (the 8 tracks of the current bank and FX / MASTER = reverb, delay and distortion settings, master volume, master filter; "FX / MST" on phones).
- Parameter list: it is grouped into SOUND, FILTER, EQ, SEND and INSERT (for FX / MASTER: MASTER — volume, master filter, sidechain depth and glue — REVERB, DELAY and DIST). Each row shows that parameter's lines and locks for the whole pattern in small, so you can see at a glance what moves. Tap to select.
- Choose what to draw with the buttons at the top (FREE / LINE / WAVE = lines, LOCK = locks):
- LOCK: tap = lock that step to the height you touched (parameter lock). Swipe to lock every step your finger passes.
- FREE / LINE / WAVE: swipe in any direction to draw a line. A tap draws just that point.
- With either, hold (it vibrates), then swipe to erase locks and lines where you swipe.
- The one you are not drawing is shown faint, so locks and lines stay easy to tell apart. Where a step has both, the lock wins.
- Locks: on a track, a locked hit plays with that value, and it holds until the next hit (or lock); hits without a lock go back to the normal value. For FX / MASTER, a lock lasts for that step only.
- Sounding notes follow too: pitch, decay and end (start when reversed) change not only at the start of a note but while it is still sounding, following lines, locks and knob moves (draw a line over a long sound and its pitch glides as it plays). Moving end before the current position stops the note with a short fade.
With lines and knob moves, pitch also takes values between semitones, so it glides smoothly. Locks snap to whole semitones, so use a lock when a step needs an exact note. - Lines: where you drew, the line's value is used; elsewhere the normal value (dotted line). The strip at the very bottom of the drawing area is below 0: touching it still gives 0 (so you can draw 0 even on devices where a swipe up from the screen edge goes home). Each step has 8 points, smoothly joined. Three shapes:
- FREE = follows your finger.
- LINE = a straight line from where you touch to where you let go (fades, a filter that slowly opens).
- WAVE = a waveform. Drag sideways for its length; it moves between the height where you touched and your finger's height. With WAVE selected, a second row shows the shape (SIN / TRI / SAW / SQR) and one cycle (1/32 to 1 BAR, 1/8T = eighth-note triplets). Great for wobble bass, tremolo and auto-pan.
- 1–4 switch the page shown (shown when the pattern is longer than 16 steps; FOLLOW reads "FLW" on phones). With FOLLOW on, the page follows the playback position (it is the same setting as FOLLOW in SEQ: switching either one changes both; the page stays put while you are drawing).
- ⋯: "Clear (parameter name)" removes all locks and lines of the selected parameter. KNOB REC is here too: with REC on and playing, moving an on-screen control (or a MIDI CC) records the movement. DRAW (default) = as a line, LOCK = as a lock on the nearest step. OFF = don't record; the control changes the value as usual. While recording, the normal value is left unchanged.
- Phones: FULL at the top right hides the top buttons and the left tabs so you can draw on almost the whole screen. In full screen, ▶ / ■ (play / stop) and EXIT appear at the top right.
- Priority: a control you are moving now > lock > line > normal value (the main fader's USER adds to or subtracts from the result).
- Undo (↶) works. CLEAR in the header clears locks along with the steps and keeps lines.
Locks work much like Elektron's parameter locks. On a track with its own length (polyrhythm), DRAW positions follow that track's steps.
9. Tempo
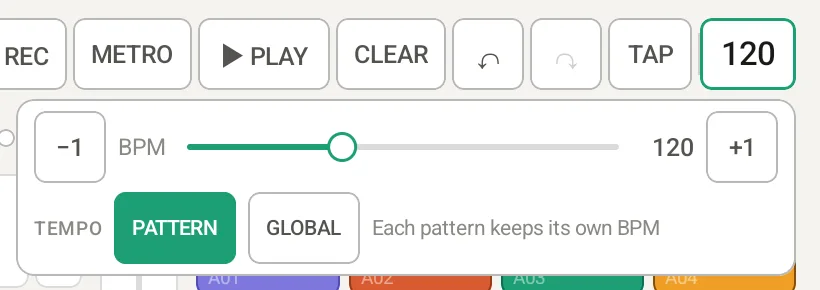
- Tap BPM: slider (20–300), with −1 / +1 for fine steps.
- Long-press BPM: type a number.
- TAP: tap a few times with the beat to set the tempo (resets after 2 seconds).
Tempo per pattern (TEMPO: PATTERN / GLOBAL)
TEMPO below the slider chooses how the tempo is kept.
- PATTERN (default): each pattern has its own tempo. Changing BPM sets the current pattern's tempo, and switching patterns switches the tempo too (while playing, at the switch point set by Pattern switch in the menu, and row by row in SONG). Undo (↶) brings tempo changes back.
- A pattern with nothing in it yet keeps the tempo from before, and remembers the tempo when you first add a note.
- GLOBAL: one tempo for every pattern — for live sets where switching patterns should not change the tempo. Going back to PATTERN restores each pattern's tempo.
- While receiving MIDI clock (RECEIVE), the tempo follows the connected device.
10. Saving, loading and sharing
| Type | Contains | File |
|---|---|---|
| Project | All 100 patterns, kit, BPM and song (including sounds you loaded) | .dbrproj |
| Pattern | The current pattern (no kit) | .dbrpatt |
| Kit | Sounds and settings of the 16 tracks | .dbrkit |
The first time
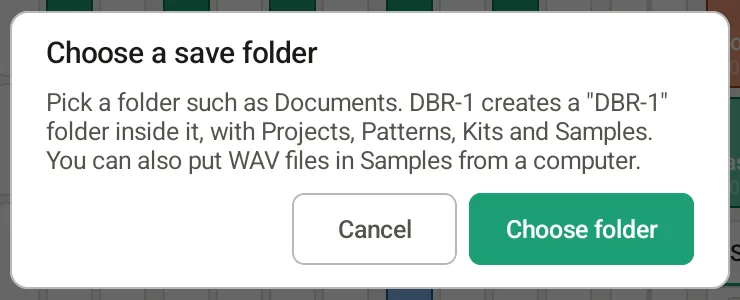
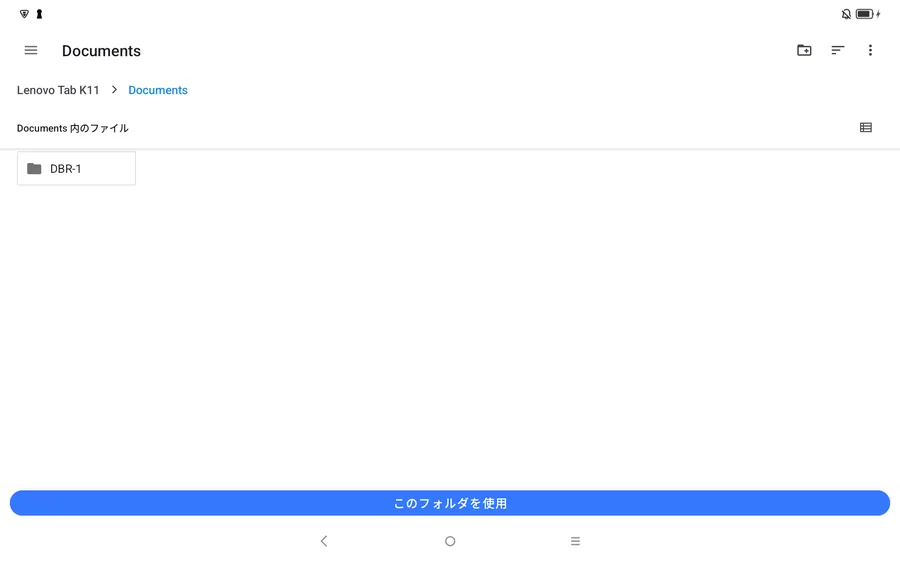
Choose a save folder once. DBR-1 creates a DBR-1 folder inside it (Projects / Patterns / Kits / Samples, and Sounds once you save a sound).
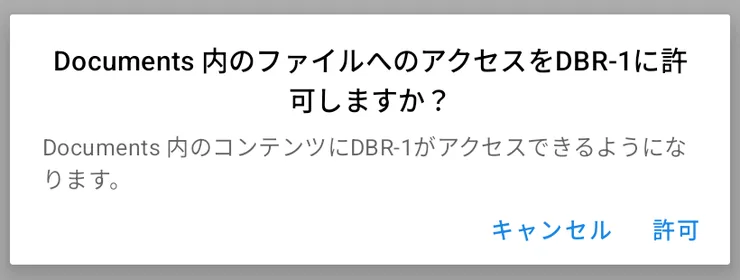
Saving
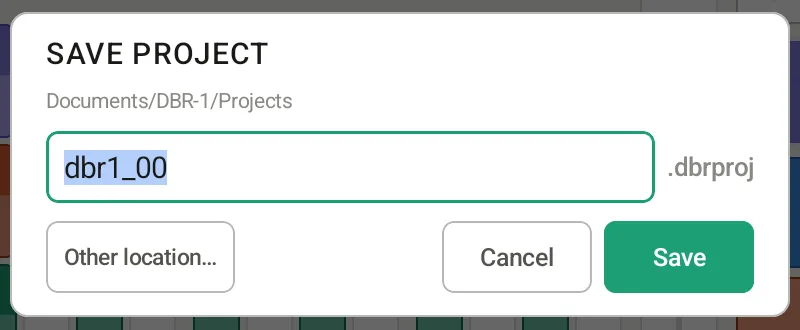
SAVE → choose a type, then press Save (you can keep the suggested name). If a file with the same name exists, you are asked before it is overwritten. Other location… opens Android's save screen, so you can save straight to Google Drive or other cloud storage.
Loading and sharing
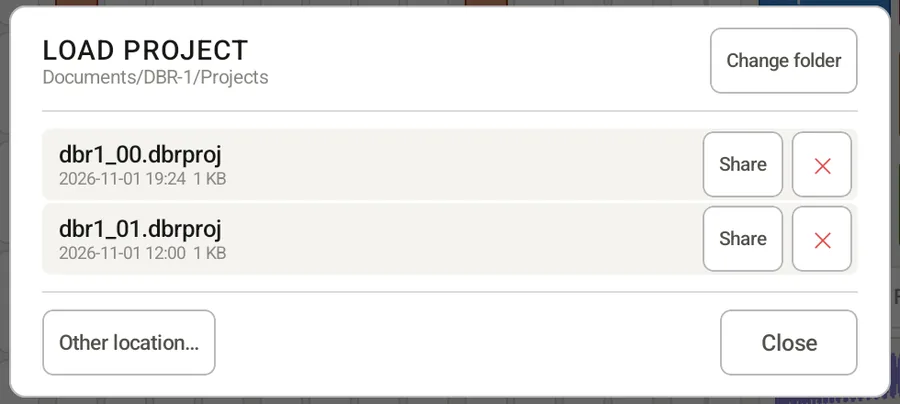
- LOAD → choose a type to see the files in the folder, newest first. Tap a name to load it (you are asked before anything is overwritten).
- Share sends the file by email, Drive, messages and so on. ✕ deletes it (with confirmation).
- Change folder picks another save folder. Other location… opens a file from anywhere, including the cloud.
- Copy WAV files from a computer into DBR-1/Samples, then load them from the USER tab of SOUND → LOAD.
Export (audio, video and MIDI; share on social media and messages)
SAVE (≡ on phones) → Audio export… turns your music into an audio, video or MIDI file.
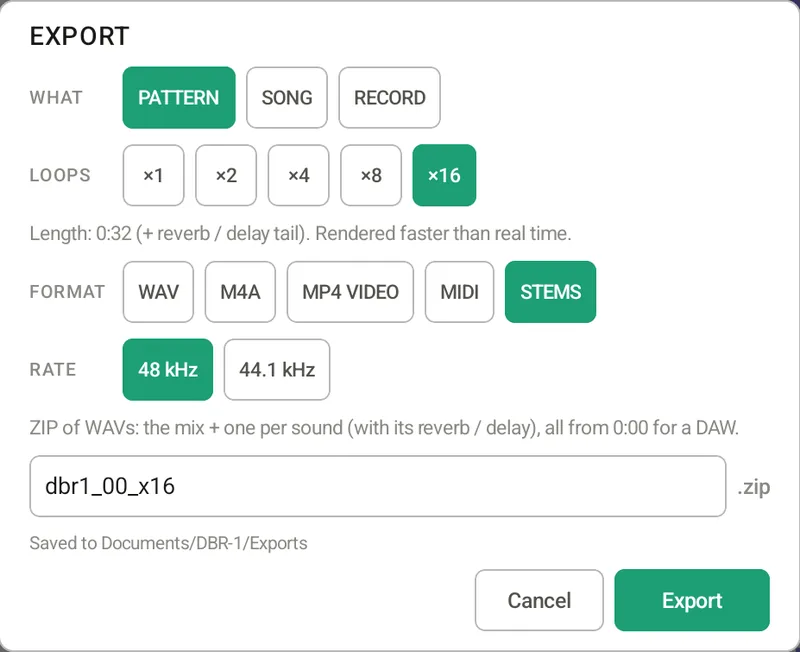
| WHAT | Contents |
|---|---|
| PATTERN | The current pattern ×1 to ×16, rendered much faster than real time |
| SONG | The SONG tab from the first row to the last |
| RECORD | Records exactly what you hear (pads, ROLL, REV and the filter included). While recording, stop with ■ STOP at the top left (in place of ≡ on phones). Up to 10 minutes. With MP4 VIDEO it becomes a screen recording: the DBR-1 screen plus a circle where your fingers touch (1280 wide, 30 fps). The STOP bar and dialogs are not recorded |
| FORMAT | Best for |
|---|---|
| WAV | Uncompressed (16-bit stereo). Editing in a DAW. For PATTERN / SONG, RATE picks 48 kHz or 44.1 kHz to match your DAW project (STEMS too) |
| M4A | AAC 256 kbps. Small files for LINE, Discord, email and cloud storage |
| MIDI | Standard MIDI file (PATTERN / SONG only), for carrying on in a DAW or another drum machine. Note numbers follow NOTES in MIDI… (PADS 36–51 / GM DRUMS). Swing and per-track lengths are included; muted tracks (or non-solo tracks while soloing) are left out. TYPE: 1 · TRACKS = one track per sound (named after the track) / 0 · SINGLE = everything in one track (for gear that cannot read Type 1). CH: CH 10 = everything on channel 10 / CH 1–16 = TRACKS = A01–B08 on channels 1–16 (the same order as the CC "CH = TRACK" setting in MIDI…). AUTO: CC = automation (locks and drawn lines) written as CCs (numbers from the CC assignments in MIDI…; parameters without a CC are skipped). Track values go on that track's channel; FX / MASTER go on the OUT CH in MIDI… (in Type 1, a last "FX / MASTER" track). On channel 10 the CCs of different sounds share one channel, so choose CH 1–16 when you use automation |
| STEMS | A ZIP (PATTERN / SONG only) with the full mix (00_mix.wav) and one WAV per track that has steps (01_A01_kick.wav …), 16-bit stereo at 48 or 44.1 kHz. Each track includes its own reverb, delay and FX; every file is the same length and starts at 0:00, so they line up as soon as you drop them into a DAW. Muted tracks are left out. It renders once per track, so it takes a little longer |
| MP4 VIDEO | PATTERN / SONG: a video (720×720) with a picture of the pattern. RECORD: a screen recording. For X, Instagram, TikTok and other video-first networks |

- You can switch to another app during an export — it keeps going and saves the file (a notification such as "Exporting…" shows meanwhile). On Android 13 and later, your first export asks for permission to show notifications. Exports work without it; you just won't see the notification.
- Closing the app or switching to another app while recording stops the recording and saves it.
- If the audio output changes while recording (plugging in earphones or USB audio), the recording stops there and is saved.
- On devices that cannot record the screen, you get a video with a picture of the pattern instead.
PATTERN and SONG exports end with the reverb and delay tail. Files are saved in DBR-1/Exports; when finished, Share sends the file straight to an app.
11. MIDI and USB audio
Connect a USB-MIDI device (pad controller, keyboard, the MIDI ports of an audio interface, …) and DBR-1 uses it automatically. Settings are under MIDI… in the logo menu (≡ on phones).
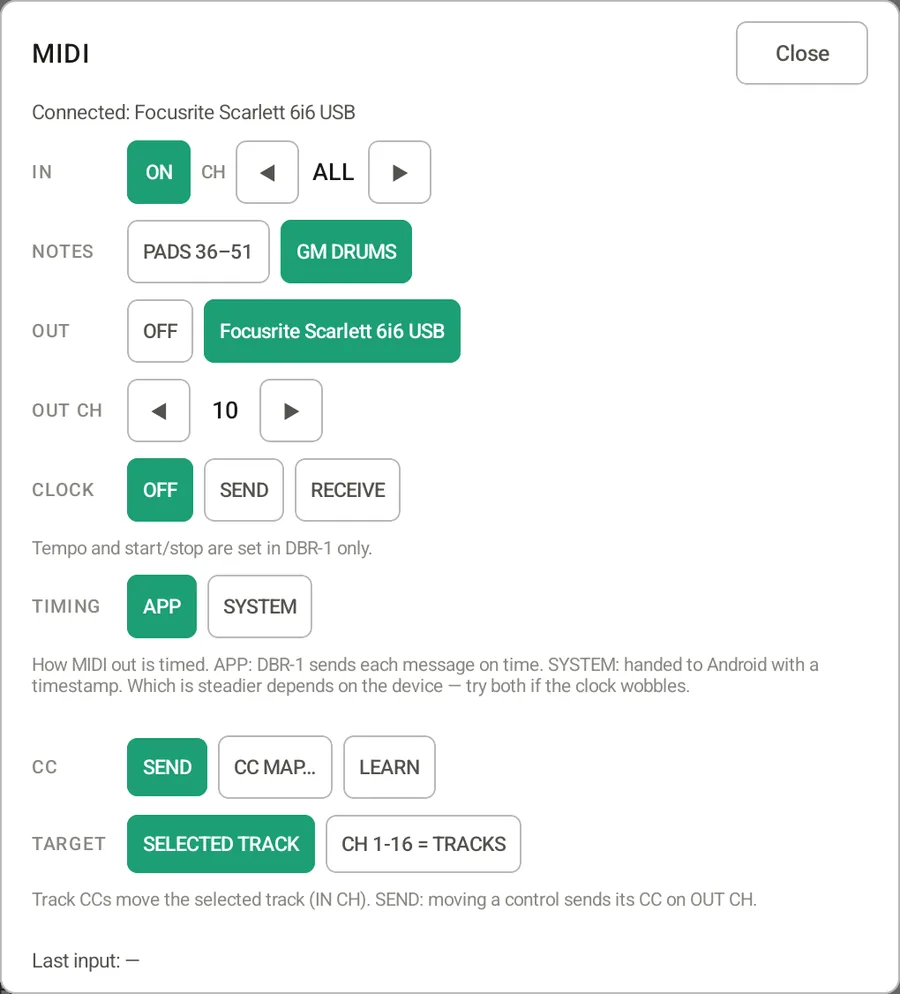
| Item | What it does |
|---|---|
| IN (on/off, CH) | Incoming notes play tracks and are recorded while REC is on (with their velocity). CH = channel to listen to (ALL / 1–16) |
| NOTES | How note numbers map to tracks. PADS 36–51 = notes 36–51 to A01–B08 in order. GM DRUMS = standard drum notes (kick 36, snare 38, hat 42, …). The same map is used for output |
| THRU (ON / OFF) | MIDI thru: what you play on connected devices (notes, CC, pitch bend…) is passed as is to the OUT device, on its original channel. Normally nothing from the OUT device itself is sent back to it; clock and SysEx are not passed. Incoming notes still play DBR-1's tracks as before. ☐ ALSO FROM OUT DEVICE (while THRU is ON): when checked, what comes in from the OUT device is passed too. Check it when one MIDI interface carries both (keyboard on its IN, sound module on its OUT); otherwise nothing is passed. If it is checked and a synth is connected directly as OUT (not through an interface), the synth's own notes come back to it and may play twice or hang. Uncheck it, or set the synth's Local Control to OFF If devices are cabled in a loop, the same notes may be sent around repeatedly |
| OUT / OUT PORT / OUT CH | Device and channel to send to (default ch 10). For devices with several outputs (MIDI interfaces), OUT PORT picks the port. Sends the sequence, rolls and pad hits, delayed to line up with DBR-1's own sound |
| CLOCK | OFF / SEND (DBR-1 leads: sends tempo clock and Start / Stop) / RECEIVE (follows the connected device's Start / Stop and tempo) |
| TIMING | How MIDI out is timed. APP (default) = DBR-1 sends each message on time / SYSTEM = handed to Android with a timestamp. Which is steadier depends on the device (e.g. SYSTEM on a Lenovo Tab K11, APP on a REDMAGIC 9 Pro). If the other device's tempo display wobbles, try both. Remembered on this device |
| PLAY | Shown only with RECEIVE. FOLLOW (default) = start and stop with the connected device's Start / Stop / IGNORE = start and stop with PLAY on DBR-1; only the clock and tempo follow the device |
| CC | SEND = moving an on-screen control sends its CC (to the OUT device). CC MAP… = the list of CCs and parameters. LEARN = teach an assignment |
| TARGET | Which track the track-parameter CCs move. SELECTED TRACK (default) = the selected track (received on IN CH, sent on OUT CH) / CH 1-16 = TRACKS = MIDI channels 1–16 are tracks A01–B08 |
| Last input | The last note received and the track it played — handy for checking the mapping |
CC (controller knobs)
Controller knobs (control change) can move track volume, pan, pitch, decay, start / end, filter, EQ and sends, plus the effects, master volume and master filter. These are assigned from the start:
| Track | CC | FX / MASTER | CC |
|---|---|---|---|
| Volume / Pan / Pitch | 7 / 10 / 16 | Master volume / Master filter | 102 / 103 |
| Decay / Start / End | 72 / 17 / 18 | Reverb size / damp / mix / pre-delay | 104 / 105 / 106 / 107 |
| Filter cutoff / reso | 74 / 71 | Delay time / feedback / mix | 108 / 109 / 110 |
| EQ low / mid / high | 20 / 21 / 22 | Dist drive / tone / level | 111 / 112 / 113 |
| Reverb / Delay / Dist send | 91 / 92 / 94 | Sidechain depth / Glue comp | 114 / 115 |
| Insert A / B / mix | 76 / 77 / 78 |
- LEARN: a banner appears at the top. Move an on-screen control, then turn a knob on your controller to assign its CC (repeat as often as you like). Tap DONE when finished.
- CC MAP…: tap a number to type it, × removes it, Default restores the original assignments. One CC moves one parameter.
- With SEND on, controls you move on screen are sent as CCs (received CCs are not echoed back). With SELECTED TRACK, choosing another track sends all of its values so a controller with displays stays in sync.
- CCs received while playing with REC on are recorded as automation (→ Automation).
USB audio
USB audio interfaces and USB-C headphones take over the sound as soon as you plug them in. About (in the logo menu) shows the current output.
Multi-out (Audio I/O…)
With an audio interface that has more than 2 outputs (the Scarlett 6i6 has 6, for example), each track can go to its own output, so a mixer can take them on separate channels. Set it up under Audio I/O… in the logo menu (≡ on phones).
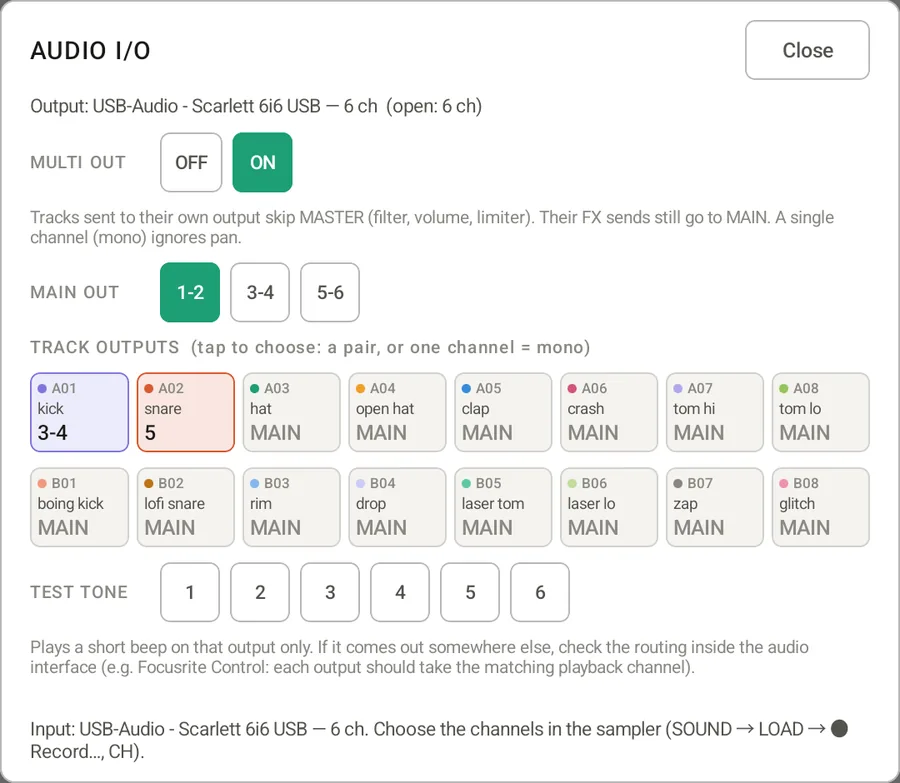
| Item | What it does |
|---|---|
| SOUND OUT | Shown while a USB device is connected. USB (default) = sound comes out of the USB device / THIS DEVICE = sound plays from the tablet or phone itself (wired headphones, then Bluetooth, then the speaker) and the USB device is used only for MIDI and recording input (for example, drive external gear from the interface's MIDI ports while you listen on the tablet). Multi-out is not available with THIS DEVICE. Remembered on this device |
| MULTI OUT | ON opens all of the device's output channels (OFF = the usual stereo 1-2). Remembered on this device |
| MAIN OUT | The pair that carries MAIN (the overall mix, FX and metronome): 1-2 (default) / 3-4 / 5-6 / … |
| TRACK OUTPUTS | Where each of the 16 tracks goes. Tap and pick from the list: MAIN / a pair (3-4, 5-6 …, stereo) / a single channel (3, 4, 5, 6 …, mono). Tracks sent to the same output are summed. In the mixer you can also tap the output under the channel name to choose it (anything but MAIN turns MULTI OUT on; under MASTER you pick the MAIN pair, or "Stereo only" = OFF) |
| TEST TONE | Plays a short 1 kHz beep on that output only. If you hear it somewhere else, check the routing inside the audio interface (on a Scarlett: Focusrite Control → Routing, each output should take the playback channel with the same number) |
- A track sent to its own output keeps its filter, distortion, EQ, volume and pan (no pan on a single channel), but skips MASTER (master filter, MASTER volume, limiter). Its reverb / delay sends still go to the FX on MAIN.
- Note: multi-out can add latency; on some devices it does not use the system's low-latency path and lags a lot (e.g. about 0.3 s on a REDMAGIC 9 Pro with a Scarlett 6i6, versus about 0.02 s in stereo). Play the pads in stereo (MULTI OUT OFF) and use multi-out for sending tracks to a mixer or recording. Also, and some device and interface combinations give silence or noise. On Android 14 and later DBR-1 asks the system to open the interface at 48 kHz; on older Android the system may open it at its highest rate (e.g. 192 kHz) and stay silent (e.g. a Lenovo Tab M10 3rd Gen with a Scarlett 6i6; on that tablet even stereo and other apps are silent). If so, set MULTI OUT to OFF (stereo).
- Crackle, or sound that seems slightly slow, can also come from power noise. Try unplugging a USB charging cable from the tablet or the interface (confirmed with a Lenovo Tab K11 and a Scarlett 6i6).
- Export and RECORD capture MAIN only.
- Unplug the device and DBR-1 falls back to stereo; plug it back in and multi-out returns.
12. Troubleshooting
| Problem | Check |
|---|---|
| The sound comes late after a tap | Bluetooth headphones and speakers add a lot of delay. Use wired headphones, the built-in speaker or USB audio. About shows the “Output latency” (about 20–60 ms depending on the device) |
| The sound breaks up | Check whether “underruns” in About increases. Closing other apps can help |
| A saved file is not in the list | Make sure the folder shown at the top of the LOAD list is where you saved. Change folder lets you pick it again |
| A MIDI device does nothing | In MIDI…, check that the device is listed under Connected, IN is on and the channel matches. Last input shows what arrives |
| I made a mistake | ↶ undoes up to 100 steps. The tempo with TEMPO set to GLOBAL, play / stop, moving between patterns and device settings are not undone |
The app version and open source licenses are under About in the logo (≡) menu.
13. Specifications
Sequencer
| Item | Spec |
|---|---|
| Tracks | 16 (banks A / B × 8) |
| Patterns | 100 (00–99), each 1–64 steps (16th notes); each track 1/16, 1/16T or 1/8T |
| Track length | 1 to the pattern length (up to 64) per track (AUTO = follow the pattern) |
| Velocity | 0–127 per step |
| Probability / ratchet | Probability 0–100% (5% steps), ratchet 1–4 hits, per step |
| Swing | 0–100 per pattern (100 delays off-beat 16ths by half a step) |
| Tempo | 20–300 BPM |
| Song | Up to 99 rows; each row = pattern × 1–99 repeats |
| Pattern change | While playing: at the end of the pattern / the next beat / the next 16th (Pattern switch, or per PERF button); immediately when stopped |
| Recording | Quantized to the nearest step; one-bar count-in when starting with REC on |
| Roll | 1/4, 1/8, 1/16, 1/32, with or without SLIP |
| Performance screen | 18×10 grid × 4 pages (saved on the device, separately for tablet and phone). 17 button actions (while held / toggle; includes MIDI NOTE / CC / PROGRAM), faders and knobs (FLT / USER / a single parameter / MIDI CC, CC PAN, PITCH BEND, AFTERTOUCH; any of channels 1–16 at once or ALL, to one or more outputs) |
| Undo | Up to 100 steps (steps, kit, song, pattern tempo) |
| Automation | Per pattern. Per-step locks or a line with 8 points per step. 17 track and 14 FX / master parameters |
Samples and sound
| Item | Spec |
|---|---|
| Formats | WAV (PCM 8/16/24/32-bit, 32-bit float), AIFF / AIFC, MP3, M4A (AAC), OGG, FLAC |
| Sample rate | 8–192 kHz (converted to the output rate on playback) |
| Length | Up to 60 seconds each (only the first 60 seconds of a longer file are used) |
| File size | Up to 100 MB |
| GENERATE | Up to 2 waves (BASIC 5, SYNTH 5, INST 10, DRUM 8, NOISE 3, SAMPLE), AMP (ADSR), FILTER (LP / HP / BP with envelope), DRIVE; keys C1–B6 × single note / 13 chord types. Rendered at 48 kHz mono, up to 8 seconds, then trimmed and used via the sampling screen |
| Sampling | Built-in mic / USB input / DBR-1's own output (resampling, BARS 1–8, PAD one-shots up to 10 s), up to 60 seconds (48 kHz, mono; stereo inputs as L+R / L / R, devices with 3+ channels by channel number). Saved as 16-bit WAV (RATE can lower it to 8–32 kHz; BIT 12 / 8 also available). Up to 16 slices; time stretch 50–200% (pitch unchanged) |
| Channels | Played as mono (stereo files are mixed down) |
| Memory | Held as 16-bit; only the sounds of the current kit (16) stay in memory |
| Built-in sounds | 164 (16 in the kit + 4 extra, 44.1 kHz / 24-bit; 32 in POP and TRANCE and 112 from the demo songs, 44.1 kHz / 16-bit). The 64 pitched ones show a note or chord name (A4 = 440 Hz) |
| Demo songs | 7 (Sequence Yard / Let's Play Sequence / Yard Lights / Haze Yard / Candy Yard / Velvet Sequence / Abyss Yard, about 2 minutes each) |
| Polyphony | One sound per track (a new hit quickly fades out the previous one) |
| Play modes | ONE SHOT / GATE (one step) / BAR (until the end of the pattern); STOP silences everything |
| Choke groups | 4 (a sound in the group stops the others within about 5 ms) |
| start / end | 0–127 (the part of the sample that plays) |
| pitch | −12 to +12 semitones (changes playback speed) |
| decay | About 10 ms – 2 s; 127 = no decay |
| pan | L64 – C – R63 (equal power; MIDI 0–127 with 64 at the center) |
| Values | Amounts such as volume, sends and effects read 0–127, the same as MIDI (they match the CC values sent and received). Pitch is in semitones, EQ in dB, cutoff in Hz |
| Mixer | Track EQ (LO shelf 30–500 Hz, default 100 Hz / MID peak 200 Hz–8 kHz, default 1 kHz, Q 0.7 / HI shelf 2–16 kHz, default 8 kHz; ±12 dB each; the frequencies are not automatable or CC-mapped), volume 0–127, pan, S / M; MASTER 0–127 (saved); meters −48 to 0 dB |
| Reverse | REV SEQ (step order) / REV SND (samples) |
Filters and effects
| Item | Spec |
|---|---|
| Track filter | LP12, LP24, HP12, HP24, BP, NOTCH; cutoff 20 Hz – 20 kHz, reso |
| Master filter (FLT) | LP / HP (fader down / up) or BP, 12 dB / 24 dB, reso, AUTO RETURN |
| USER (main fader) | USER1 to USER8 (names up to 5 letters), up to 16 assignments each (16 tracks × 17 parameters / 14 FX & master parameters), amount −100 to +100% (5% steps). Adds to the current value and stops at the limits |
| Reverb | size, damp, mix, pre-delay (0–200 ms); one shared reverb with a send per track |
| Delay | time, feedback, mix, sync (1/4, 1/8, 1/16, 1/32, 3/8, dotted 1/8, FREE 10 ms – 1 s); stereo, one shared delay |
| Distortion | drive, tone, level; per track |
| INSERT | One per track: COMP, CHORUS, PHASER, WAH, SWEEP (tempo-synced), CRUSH. Two knobs + mix. After the filter, before DIST |
| MASTER | Sidechain (one trigger track, depth, release 30–630 ms) and glue comp (threshold 0 to −24 dB, 2:1 to 4:1) |
| Limiter | Just before the output (from about −1 dBFS, no added latency, also applied to exports) |
| Scenes | Two effect settings (A / B) per pattern |
Saving
| Item | Spec |
|---|---|
| Autosave | 3 seconds after an edit and when the app closes (the previous version is kept as a backup) |
| Files | .dbrproj (project, includes loaded sounds) / .dbrpatt (pattern) / .dbrkit (kit, includes loaded sounds) / .dbrsnd (one track's sound, includes the loaded sample) |
| Location | DBR-1/Projects, Patterns, Kits, Samples and Sounds inside the folder you choose; cloud via Android's save and share screens |
| Export | Pattern (×1–16) / song / live recording (up to 10 minutes). MIDI (SMF type 0 / 1, 96 PPQ, channel 10 or channels 1–16, automation as CCs at 8 points per step; pattern and song only). STEMS (ZIP: mix + one WAV per track; pattern and song only). WAV (16-bit stereo; pattern / song and STEMS at 48 or 44.1 kHz, recordings at the device's output rate) / M4A (AAC 256 kbps) / MP4 (H.264 720×720 30 fps + AAC; screen recordings are 1280 wide in the screen's aspect ratio). Saved in DBR-1/Exports |
MIDI and audio
| Item | Spec |
|---|---|
| MIDI in | USB-MIDI. Note-on plays and records tracks (with velocity). Channel ALL / 1–16 |
| MIDI out | One USB-MIDI device. Sends the sequence, rolls and pad hits as notes (channel 10 by default, note-off after 80 ms) |
| Note map | PADS 36–51 / GM DRUMS |
| MIDI clock | Send (24 PPQN = 24 per quarter note, Start / Stop) / receive (follows Start / Stop and tempo; Start / Stop can be ignored) |
| MIDI CC | Receive and send. 31 parameters (17 per track, 14 FX / master), editable assignments and LEARN. Selected track / channel = track |
| Multi-out | With a USB device that has more than 2 outputs, each track can use its own output pair or a single channel (mono), up to 16 ch. The MAIN pair is selectable too. Test tone per channel |
| Audio output | Stereo at the device's output rate (usually 48 kHz), low-latency path. USB audio supported (switches automatically when plugged in) |
Requirements
| Item | Spec |
|---|---|
| OS | Android 9 or later |
| Memory | 3 GB RAM or more recommended (the app uses about 200 MB while playing) |
| Screen | Landscape. Tablet layout at 1280 dp wide and 600 dp tall or more; phone layout otherwise. Physically large tablets (12-inch class and the like) whose high display density leaves fewer dp get the tablet layout scaled to fit |
| Text size | The device's font size setting applies up to 115% in the app's screens (larger settings stop at 115% so buttons and labels aren't cut off). The manual follows the device setting |
| Permissions | No internet or location. The microphone is used only in the sampling screen. Notifications appear only while exporting or recording. Files are read and written only in the folder you choose |
Latency depends on the device (about 20–60 ms on the devices we tested). Bluetooth devices add a lot of delay.